Showing posts with label adr. Show all posts

Thursday, April 29, 2010

{Audio post: Ghost Dog ADR_pt2}


Today let's finish up the Ghost Dog projects from last time. Once you've got your ADR recorded, you should concentrate on the following:

Part 3 - The Score
You guys are all pros on producing scores by now. For this piece, the challenge is to try to figure out what the mood of the scene is and make that happen musically. What would you say was the mood of the original piece? How did the composer (the RZA) help to create the mood with music?
  1. Create a Stereo Aux Input
  2. Insert Reason on it.
  3. Create an original piece of music that fits the mood of the scene.
Part 4 - FX
This part is sort of optional, but can help to make the scene more convincing, if you want to try. In the original scene, there were hardly any sounds beyond the dialog and the music (there is a faint sound of pigeons fluttering at the end).

The one thing I want you to add is some street sounds in the background when the dialog happens.

You can add some additional sounds if you choose with the following restriction: do NOT add sounds that distract the audience's focus from what's happening visually! (e.g. gunshots, screaming, random sounds, etc.)

Here are a few ideas for sounds that would be appropriate:
  • Pigeons
  • Footsteps
Part 5 - Editing & Mixing
This is really important. Once we've got all of our sound elements in the session, we need to make sure that they're all clean and balanced correctly. We also want to add some

First, clean it up...
  1. Use the Trim Tool to cut off the extra bits at the beginning and ends of the dialog regions.
Now let's set up a good balance by paying attention to the overall levels of all the tracks.
  1. Go to Track>New and create a Stereo Master Fader.
  2. In the Inserts section of Master Fader track, click on Multichannel Plugin>Sound Field>Phase Scope. You should see this pop up:The meters on the left side will help us to see exactly how loud the peaks of our tracks are.
  3. Now Solo the dialog tracks.
  4. Play the part with the dialog back and watch the levels on the Phase Scope meters.
  5. Important: dialog in audio post production should hit about -6dB at its loudest parts. If your dialog is not loud enough, turn up the faders on the tracks so that the peaks are at -6dB.
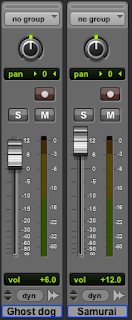
  6. Unsolo the dialog tracks.
  7. Listen to the whole thing including the music. How is the balance between the music and the dialog? In general, they should be about the same volume (we're going to adjust this next), but if the music is way louder or softer than the dialog, raise or lower it to whatever it needs to be.
Now let's make it so that when the characters start speaking, the music dips down a little bit and we can hear them better...
  1. Use the Grabber Tool.
  2. Zoom in so that you can see the dialog clips well.
  3. On the Aux Track, you should see a line that goes across the screen showing the volume level. Right before the dialog starts, click on the line to create a dot.
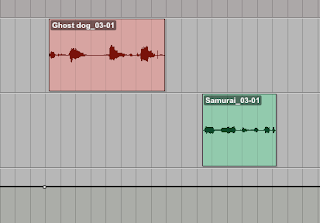
  4. Click on the line at the end of the dialog to create another dot.
  5. Make two more dots in between the beginning and the end of the dialog.
  6. Click and drag these dots down to make the volume come down during this scene and then come back up at the end.
  7. Listen back to this scene and move the dots around to adjust them. The goal is to make this dip sound smooth and not very noticeable to the audience.
  8. Save
When you think you've got everything done, have an instructor check your work. If it's all good, do the following:
  1. Bounce to Quicktime movie.
  2. Name the file: your name_Ghost Dog ADR
  3. Put a copy of the Quicktime movie in Shared Media>Student Work>Ghost Dog ADR

Tuesday, April 27, 2010

{Audio post: Ghost Dog ADR}

Today we're going to start working on a project that involves two of the areas of audio post-production that we have been discussing: ADR and scoring. In addition, we're going to use some mixing techniques to give the piece an interesting and (hopefully) believable flow.

First, let's watch the clip we're going to be working with. This is a scene from the 1999 movie, Ghost Dog, directed by Jim Jarmusch and starring Forest Whitaker. Check it out:

What are the main sound elements we can hear in this scene?
What kind of mood is the music creating?
What do we notice about the volume levels throughout the scene?
Is there anything about the dialog that you think might be challenging?

So, you are now going to work with this clip and replace all the sound with your own...

Part 1 - Preparing the Session

Please do the following:
  1. Look in Shared Media>Class Materials>Film clips and find the file called: Ghost Dog_RZA.mp4
  2. Copy the file to your computer.
  3. Pick a partner.
  4. One of you needs to create an Empty Pro Tools session called: Ghost Dog ADR
  5. In the session, create 3 Mono Audio tracks.
  6. Label one audio track: Ghost Dog
  7. Label the other audio track: Samurai
  8. Label the 3rd track: TB
  9. Import the video into your project.
  10. Play it back and listen carefully for the part where the Samurai in Camouflage (the RZA) starts speaking. Drop a marker exactly at this point. Name it: RZA
  11. Save this session and quit out of Pro Tools.
  12. Put a copy of the Pro Tools session in your folder on the Shared Media drive.
Part 2 - Recording ADR
You are going to work with a partner to record the ADR for this scene. You will play one character and he will play the other. You will take turns engineering and preforming the lines. Here is the dialog:

Samurai in Camouflage: Ghost Dog, power, equality.
Ghost Dog: Always see everything, my brother.

Please do the following:
  1. On the Instructor Station, copy your Ghost Dog ADR Pro Tools session to the folder called Student PT Sessions on the desktop.
  2. Open the session.
  3. Check your Mic Inputs and make sure they match this setup:
  4. Decide which one of you is going to play Ghost Dog, and which one is going to play the Samurai.
  5. Have the first person go in the vocal booth, and the other person set recording levels.
  6. Make sure that the video clip is big enough and the monitor is angled so that the performer to see the lips of the characters.
  7. Do a few practice run-throughs and decide if you want to record while listening to the original audio, or if the track should be muted.
  8. Record!
  9. If you get a take that you think is good, but you want to try another one, create a new Playlist by clicking on the little triangle next to the track name, and then clicking on New.
  10. When it asks for a name for the Playlist just click OK.
  11. Record as many times and create as many playlists as you need to get a good take.
  12. Switch positions with your partner and repeat Steps 5-11 for the other character.
  13. When you think you're done, SAVE the session.
  14. Put a copy of the session in your folder on the Shared Media folder.
  15. Go back to your desks and copy the PT Session to each of your computers.
  16. Open the session and pick the best playlists for each character.
  17. Do some basic editing to clean up the audio (trim the edges, fade ins/outs, etc.)

Audio Post: ADR

Did you know that most of the dialog that you hear in a movie was not recorded at the time when the scene was actually being shot? A lot of the actors' lines were rerecorded in a studio in order to get better sound quality, or sometimes a better performance. This process is called Automated Dialog Replacement, or ADR. The trick is for the actor to be able to recreate the emotion from the scene and make it sound as natural as possible. Here is a clip showing the ADR process on the film "King Kong".


Real ADR is done through a process called looping, where a short scene is played over and over and the actor performs his/her lines repeatedly until he/she gets them just right. It is the mixing engineer's responsibility to make the recording sound as believable as possible in the scene. Think about it...if the scene takes place in the middle of, say, an empty parking lot,
are the voices going to sound the same as they do inside a padded vocal booth? Of course not! So, the engineer has to figure out how he/she can match the sound of the actor's voice to the place being shown on the screen. This is done by making decisions in the recording process (microphone choice and placement) and in the mix afterward (using reverb, EQ, pitch adjustment, and other FX to make it sound like the character is in the actual setting on screen).

Today, we're going to do a little bit of our own ADR...