 We've been working on getting our editing skills down in Pro Tools. Today we're going to apply these skills to a common and useful music production technique: making loops.
Before we get into this, however, I want to take a minute to remind everyone that when you use samples and loops, you are taking someone else's work. If you intend to use this work in your own music - especially if you want to sell it - you are legally required to get permission from whoever owns the copyright. In this class, we will be using these samples for educational purposes only.
There are 4 main steps to how we will do this:
- Import audio files into Pro Tools.
- Edit a part of the audio into a perfect loop.
- Bounce the loop out of Pro Tools as a new audio file.
- Import the loop into Reason.
Part 1 - Importing audio files
- Look in the Class Materials folder and find the folder called Loop Songs. Drag it to your computer. (dolly>Shared Media>Class Materials>Loop Songs)
- Take a quick minute to listen to each of these and pick one that you want to work with.
- Open Pro Tools and create a new session (File>Create New Session).
- Make sure the Sample Rate is 44.1kHz and the Bit Depth is 16 Bit. Name the session: your name_loops.

- Import the audio file. (File>Import>Audio File)

- In the window that pops up, pick the track you want to work with and hit the Convert button. Then click Done.

- Next, Pro Tools will ask you where you want to save this file. It should automatically go to the Audio Files folder. Click Choose.

- Now, you need to decide where in your session you want the file to go. Select New Track and click OK.

- You should now see the file in your Edit Window.

Part 2 - Editing your loop
Now the real work begins...
First let's make sure we're setup to do this right.
Go to the Options menu and click on Loop Playback. This will allow you to listen to a piece of audio in a loop.
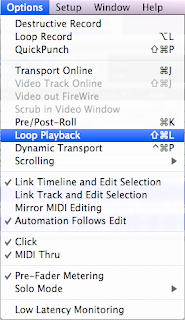 You can tell Loop Playback is on when the Play button looks like this:
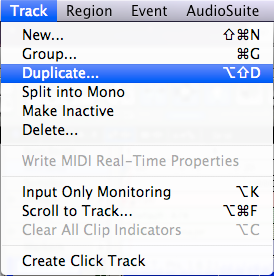
Now let's Duplicate the track so that we have a backup copy, in case something gets messed up...
Open the Track menu and click on Duplicate.
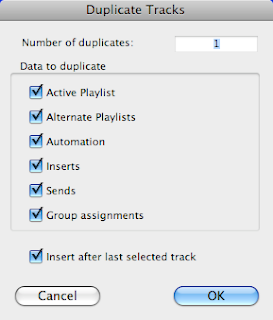
In the window that pops up, just click OK.
You should now have 2 copies of your track. Mute the first one by clicking the little M button below the track name.
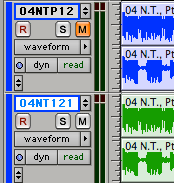
Now we can begin editing...
- Listen to the song and find a part that you want to loop.

- Zoom in so that you can see the part clearly. You might also want to make your track height larger.
- Now you need to figure out how long - how many Bars - this section is. The trick is to listen for the snare. There are usually 2 snare hits or claps to each bar. I'm going to work with a 2-bar section.
- Let the song play and listen to your loop. Does it cut off too early, or does it catch the first beat of the next bar? Adjust the little blue arrows in the Timeline up top to make the loop longer or shorter.

- Now zoom way in on the beginning point of the loop until you can see just a single line of the waveform. Click on a point at the zero line crossing and hit Command-E on your keyboard to Separate the Regions.

- Now zoom out and then zoom back in on the end point of the loop and do the same thing.

- Zoom out and you should now see the two cuts at the beginning and end of the loop.

- Using the Grabber Tool, click on the loop to highlight it.

- Hit Play and listen to it loop.
- If it sounds off, zoom in and make adjustments with the Trim tool.
- When it sounds good, save your session as: your name_Funk Loop
Part 3 - Bouncing your loop
- Using the Grabber Tool, click to highlight your loop.

- Now Bounce this out of Pro Tools as an audio file. (File>Bounce to>Disk)

- In the window that opens up, make sure the settings look like this:

- Click Bounce.
- Name your loop (your name_loop) and pay attention to where Pro Tools is going to save it on your hard drive.

- Click Save.
- Save your Pro Tools session.
- Quit Pro Tools.
Part 4 - Importing into Reason
- Open Reason.
- Create an NN19 Digital Sampler.
- In the Sequencer Track, move the L/R loop markers to match the number of bars of your loop. (e.g., 2 bar loop = L on Bar 1, R on Bar 3)
- Click the Toggle Mode button to switch to the Piano Roll View.

- Using the Pencil Tool, click and drag to draw a region that is as long as your loop.
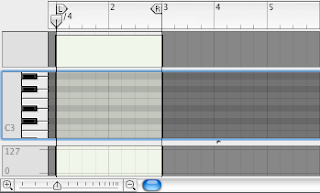
- Use the Pencil Tool to draw a note at C3 for the entire length of the loop.

- Click the Toggle Mode button to switch back to the Edit View.

- Right click on the NN19 and click on Initialize Patch.

- Click the Browse Sample button.

- Find your loop and click OK.
- Make sure the Loop On/Off button is lit.

- Hit Play and listen to the loop. Pay close attention to what happens when it gets to the end.
- Adjust the Tempo to match the loop. TIP: If the loop cuts off early, then the tempo is too fast. If there is a space between when the loop ends and starts again, then the tempo is too slow.
- When you've got the tempo just right, do Song Self Contain Settings (File>Song Self Contain Settings) to make sure your loop is locked to your file.

- Save your beat as: your name_Funk Loop
Now, using this loop, please create a 2 min. song. When you're finished, turn it into the Shared Media folder (Shared Media>Student Work>Funk Loop).

No comments:
Post a Comment