Showing posts with label frequency. Show all posts

Thursday, March 25, 2010

LFOs and Routing Parameters to the Oxygen 8

In the last few classes we've been talking about different concepts in sound (frequency, amplitude) and learning how those concepts translate to specific functions in Reason (filters, ADSR envelopes, etc.) Last time we also touched on a function called "LFO", which you see on almost every instrument in Reason. Today we're going to take a few minutes to learn a little bit more about what an LFO is and how you can use it to affect your sounds in interesting ways.

Wikipedia says:

Low-frequency oscillation (LFO) is an electronic signal, usually below 20 Hz, that creates a rhythmic pulse or sweep, often used to modulate synthesizers, delay lines and other audio equipment in order to create vibrato, tremolo, flanging and other audio effects in the production of electronic music. The abbreviation is also very often used to refer to low-frequency oscillators themselves.

That sounds kind of complicated, but let's see if we can break it down a bit and make some sense out of it...

First of all, we just learned that an LFO us usually below 20 Hz. Given what we know about the human range of hearing, what does that mean??? Basically, instead of creating a sound wave that you listen to, an LFO lets you use the wave to automatically control some other part of the sound.

For example, we know that adjusting the Cutoff Frequency ("Freq") of the filters on the Subtractor or NN19 affects the sound by changing what frequencies we are able to hear. So, you can set the LFO to automatically control the Cutoff Frequency, making it rise and fall in time with the wave created by the LFO. Still confusing? OK let's watch a short tutorial on this and see if we can get our heads around this concept:

So, we just saw one application of using the LFO to affect the filters. It can also be routed to affect any of these functions.
I recommend that you try listening to how the LFO affects all of these parameters. Right now though, we're going to do a short lesson where you work with the LFO and mess with it in real time. But first, let's quickly learn how we can set up our MIDI keyboards to control specific parameters in Reason...

Routing Parameters to Keyboard Controls
To control specific knobs or sliders in Reason with your Oxygen 8, you simply do the following:
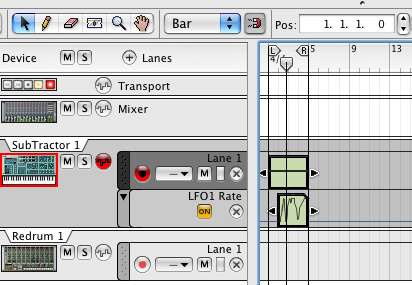
  1. Pick a knob/slider that you want to work with. (I'm going to pick the Rate knob in the Subtractor's LFO1 section)
  2. Right-click on the knob/slider and select Edit Remote Override Mapping.
  3. In the window that pops up, make sure that Control Surface is set to M-Audio Oxygen 8 and that there is a checkmark in the box next to Learn from Control Surface Input.
  4. Now move one of the knobs or wheels on the Oxygen 8. (I'm going to use the Modulation Wheel). You should see a blue meter in the Control Surface Activity section and the Control section will change to whatever knob/wheel you chose.
  5. Click OK.
  6. Now, when you move this knob/wheel on your keyboard, you should see the parameter move in Reason.
Please do the following:
  1. Open Reason and create a Subtractor.
  2. Change the settings to match the ones in the video. Pay attention to the Oscillators, Filters, Amp, and Mod sections. Also make sure that the
  3. Now find the LFO1 Rate knob and set up your keyboard so that you can control this parameter with the Oxygen 8. (See above)
  4. In Reason, draw or play a note (I recommend a low note) that goes from Bar 1-5.
  5. Play the note back and try adjusting the knob/wheel that you set up. Listen to how it affects it.
  6. When you are ready, hit Record and try moving the knob/wheel to get some cool sounds. You should see your performance get recorded into the Sequencer.
  7. If you don't like your performance, just delete the performance data and try again.
  8. Make a short (24-bar) beat that incorporates this sound.
  9. Save it as: your name_Mod Wheel and put it in the Student Work folder on the Shared Media folder.

Thursday, March 11, 2010

{Filtering Assignment}

Today we're going to start working a bit with frequency using a type of processor called an Equalizer (aka "EQ").

"What is an EQ?" you ask.

Well, an
EQ lets you boost or cut a specific frequency ranges in your tracks.

"Why would you want to do that?" you ask.

Well, because generally you want certain things to stand out more in your mix, and other things to be more in the background. Cutting/boosting certain frequencies can help you do this. Also, you can make things sound cleaner and clearer. It's sort of like having a toolkit for working on the details of your tracks.

Today we're just going to work with a very basic and extreme form of EQ-ing, called
filtering.

First let's listen to an example of filtering on a vocal in a song:


In the first verse of the song, could you hear how the vocal sounded kind of weird, almost like it was coming through a telephone? 
Since we all use phones a lot, we tend to associate this sort of sound with talking on the phone. This effect was probably achieved through the use of filters; in the mix, they filtered out the high and low parts of the singer's voice. When you talk into a phone, the phone is not able to reproduce the high and low frequencies of your voice, so what the listener on the other end hears is essentially a filtered version of your voice. 

Filtering simply lets you completely cut out a certain frequency range (highs, lows, etc.) and leave the remaining parts. This can be really useful when you are mixing and want to make sure that certain sounds that have similar frequency ranges don't clash with each other. It can also be used to create specific effects, as we just heard. Today, I want you to get some experience with filtering a vocal. We're going to use the filters on an EQ plugin to cut off the high and low frequencies to and imitate the "telephone effect".

Please do the following:
  1. Open a Pro Tools session that has vocals on it (e.g Color Scheme, Rob's Life, Friday Night, etc).
  2. Pick a vocal track that you want to work with. Solo it by clicking the yellow S button.
  3. Pick a specific region and loop it. Hit play.
  4. Go to the Mix Window.
  5. In the Inserts section at the top of the track, click on one of the sets of double arrows. Click on Plugin>EQ>7-band EQ3 You should see this window pop up:
  6. Find the sections called HPF and LPF, click the IN buttons to turn them on.
  7. Now find the spots where it says 6dB/Octave. Turn up the knobs until it says 12dB/Octave.
  8. In the HPF section, turn up the FREQ knob until your voice starts to sound kind of thin. Make a note of what frequency this happens at (about 1kHz).
  9. Now in the LPF section, turn down the FREQ knob until the voice starts to muffle a little and sound more like it's coming through a phone. Note what frequency this happens at (about 2kHz). The frequency screen should look something like this:
  10. Try Inserting EQs on different tracks and play around with all the different knobs in other parts of the EQ and see how they affect the sound of your tracks.

Fundamentals of Sound (pt. 1)_Frequency & Amplitude

So far we've discussed a bunch of different topics, from music theory to hip hop history to navigating software. Today we're going to talk a little about the science of sound.

What is sound?

On the most basic level, sound is the vibration of molecules. Since we live in an air-filled atmosphere, sound for us is usually the vibration of air molecules.

Whenever there is any kind of impact or friction in our air-filled environment, the air molecules get compressed and are pushed out of their normal positions. They then react by springing back in the other direction. Same concept as a pulling a piece of string tight and then plucking it; the molecules swing back and forth.
When molecules vibrate, they get pushed out of their normal positions and bump into their neighbor molecules. This causes the neighbor molecules to vibrate, and bump into their neighbors, which bump into their neighbors, and so on. These vibrations spread out in all directions in waves, sort of like dropping a rock in a pool of water. This is how the sound gets to your ears. The waves move outward from the sound source at a steady rate, but they get weaker and weaker (quieter and quieter) as they move farther and farther away...

If we try to draw a picture of a sound vibration, we get something like this:
A picture like this is called a waveform. By now, we're all used to seeing waveforms from our recordings in Pro Tools. And as you probably remember from editing, when you zoom in really close, then we see something like this:


What this picture is showing you is one vibration, or cycle. If we think back to the example of the plucked string, this is the equivalent of the string being plucked, then swinging out in the opposite direction, then coming back to its original position. But when you pluck a string, does it just vibrate once and then stop? Of course not! It vibrates many times, but let's keep this idea of cycles in mind as we get to the main topic for today...

FREQUENCY and AMPLITUDE

Here are the basics of what you need to understand:

Frequency = pitch (Hz)

Amplitude = loudness (dB)

Frequency is the number of cycles that happen in one second. The higher the pitch of the sound, the more cycles (aka vibrations) are happening in each second. Therefore, a note played on a high pitched instrument, like a flute, is going to have many more of these cycles in one second than a low pitched instrument, like an 808 bass drum. In the waveform diagram below, the horizontal (left to right) axis is showing frequency. You can see certain sections where the cycles are pressed more tightly together than in other parts. Do you think these parts are lower or higher in pitch compared to the parts where the cycles are spaced out more?
The unit of measurement of cycles per second is Hertz (Hz).

Amplitude is the amount of energy that goes into making the sound, i.e. how LOUD the sound is. If I slam my hand down on the table, it makes a much louder sound than if I lightly tapped the table with my finger. This is because I put a lot more energy into making the sound and our ears interpret the amount of energy as loudness. In the waveform diagram,
the height of the wave is showing you the amplitude.The unit of measurement of amplitude is the decibel (dB).

Last and thing to know for today:

The human range of hearing is approximately 20Hz to 20,000Hz.

With this information, we can start to get into really working with sound and making it do what we want! (Mwah ha ha!).

Next time, we will get into the wonderful world of harmonics...