Showing posts with label filters. Show all posts

Thursday, March 25, 2010

LFOs and Routing Parameters to the Oxygen 8

In the last few classes we've been talking about different concepts in sound (frequency, amplitude) and learning how those concepts translate to specific functions in Reason (filters, ADSR envelopes, etc.) Last time we also touched on a function called "LFO", which you see on almost every instrument in Reason. Today we're going to take a few minutes to learn a little bit more about what an LFO is and how you can use it to affect your sounds in interesting ways.

Wikipedia says:

Low-frequency oscillation (LFO) is an electronic signal, usually below 20 Hz, that creates a rhythmic pulse or sweep, often used to modulate synthesizers, delay lines and other audio equipment in order to create vibrato, tremolo, flanging and other audio effects in the production of electronic music. The abbreviation is also very often used to refer to low-frequency oscillators themselves.

That sounds kind of complicated, but let's see if we can break it down a bit and make some sense out of it...

First of all, we just learned that an LFO us usually below 20 Hz. Given what we know about the human range of hearing, what does that mean??? Basically, instead of creating a sound wave that you listen to, an LFO lets you use the wave to automatically control some other part of the sound.

For example, we know that adjusting the Cutoff Frequency ("Freq") of the filters on the Subtractor or NN19 affects the sound by changing what frequencies we are able to hear. So, you can set the LFO to automatically control the Cutoff Frequency, making it rise and fall in time with the wave created by the LFO. Still confusing? OK let's watch a short tutorial on this and see if we can get our heads around this concept:

So, we just saw one application of using the LFO to affect the filters. It can also be routed to affect any of these functions.
I recommend that you try listening to how the LFO affects all of these parameters. Right now though, we're going to do a short lesson where you work with the LFO and mess with it in real time. But first, let's quickly learn how we can set up our MIDI keyboards to control specific parameters in Reason...

Routing Parameters to Keyboard Controls
To control specific knobs or sliders in Reason with your Oxygen 8, you simply do the following:
  1. Pick a knob/slider that you want to work with. (I'm going to pick the Rate knob in the Subtractor's LFO1 section)
  2. Right-click on the knob/slider and select Edit Remote Override Mapping.
  3. In the window that pops up, make sure that Control Surface is set to M-Audio Oxygen 8 and that there is a checkmark in the box next to Learn from Control Surface Input.
  4. Now move one of the knobs or wheels on the Oxygen 8. (I'm going to use the Modulation Wheel). You should see a blue meter in the Control Surface Activity section and the Control section will change to whatever knob/wheel you chose.
  5. Click OK.
  6. Now, when you move this knob/wheel on your keyboard, you should see the parameter move in Reason.
Please do the following:
  1. Open Reason and create a Subtractor.
  2. Change the settings to match the ones in the video. Pay attention to the Oscillators, Filters, Amp, and Mod sections. Also make sure that the
  3. Now find the LFO1 Rate knob and set up your keyboard so that you can control this parameter with the Oxygen 8. (See above)
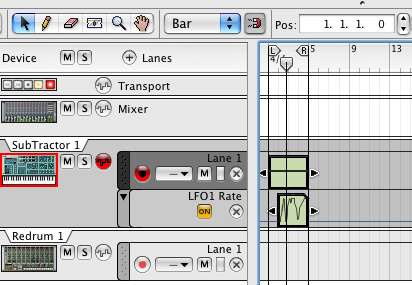
  4. In Reason, draw or play a note (I recommend a low note) that goes from Bar 1-5.
  5. Play the note back and try adjusting the knob/wheel that you set up. Listen to how it affects it.
  6. When you are ready, hit Record and try moving the knob/wheel to get some cool sounds. You should see your performance get recorded into the Sequencer.
  7. If you don't like your performance, just delete the performance data and try again.
  8. Make a short (24-bar) beat that incorporates this sound.
  9. Save it as: your name_Mod Wheel and put it in the Student Work folder on the Shared Media folder.

Tuesday, March 23, 2010

{ADSR assignment (pt. 2)_Guitar Patch}


For the next part of this assignment, we are going to create our own unique guitar sounds by sampling a guitar and then using the filters and other devices to make them sound interesting. Then you're going to use this sound in the beat you started working on in the last class.

"Where are we going to get these samples?" you ask.
Easy - you're going to record yourself playing guitar!

Check it out...

Part 1 - Recording Guitar
Everyone is going to take a turn and come up to the Instructor station. Then you're going to do the following:
  1. Launch Pro Tools and create a new session called: your name_guitar sample
  2. Create 1 new Mono Audio Track.
  3. Plug the 1/4" cable into the guitar and an input on the Digi 003.
  4. IMPORTANT! Underneath the gain knob of the Input that you plugged into, find the button called Mic/DI. Press it so that the orange light is on. If you don't do this, you will not be able to hear any sound from the guitar.
  5. Record enable your audio track.
  6. Pluck some of the strings and adjust the Input level so that you're getting a good strong signal (but not clipping!).
  7. Now pick up the guitar and get comfortable. When you are ready, put your finger on the C note here:
  8. Take the pick in your other hand and practice plucking the string. Try to get a nice clean sound without hitting any of the other strings.
  9. When you are ready, hit Record on Pro Tools and record yourself playing C. Don't stress about playing it perfectly right away. Just keep playing it as many times as you want until you feel like you got a good take. BUT, when you play the note, let it ring all the way out before you play it again. We want to get a nice clean waveform with a natural Decay and Sustain.
  10. When you feel like you've got at least one good recording, hit stop.
  11. Save the session.
  12. Copy it to your folder on the Shared Media drive.
  13. Go back to your desk and copy the Pro Tools session to your own computer.

Part 2 - Editing your Guitar Sample
  1. Open your Pro Tools session.
  2. Listen back to your performance and find the single best note in your recording.
  3. Edit this note and Split it (Command E) into its own region. Be sure to zoom in and make clean cuts at the zero line crossing!
  4. Use the Grabber Tool and click on the note region to highlight it.
  5. Bounce the region out as an audio file. (File>Bounce to>Disk).
  6. In the Bounce window, change the Format to Mono (summed) and click Bounce.
  7. In the Save Window, change the file name to: your name_guitar_C
  8. Make a mental note of WHERE you are saving your file and hit Save.
  9. If you want to export any of your other notes, go back and repeat Steps 2-8. Don't forget to use a different filename!
  10. Save your session and quit Pro Tools.

Part 3 - Sculpting Your Guitar Sample
  1. Launch Reason and open the song you started last time (your name_ADSR style).
  2. Create an NN19 Digital Sampler.
  3. Right-click on the NN19 and click on Initialize Patch to clear out the preset instrument.
  4. Click on the Browse Sample button.
  5. Find your guitar sample and load it into the NN19.
  6. Play some notes and listen to how it sounds.
  7. Now you can get into shaping it to sound the way you want.
  8. First start by adjusting the Amp ADSR settings. Do you want the sound to be shorter? Lower the Decay and Sustain time. Do you want it to start with a fade in? Raise the Attack time. Do you want the notes to go on after you let go of the key? Raise the Release time.
  9. Next, move on to the Filters. First, pick which kind of filter you want to mess with and click the red light next to it. In case you forgot...BP = Band Pass, LP = Low Pass, HP = High Pass, Notch = Notch. Try first raising the FREQ slider to get it where you want, and then adjust the RES slider to really bring the effect out. Lastly, if you want to, try messing with the ADSR settings.
  10. Now if you really want to get some weirdness going on, try messing with the LFO section. I won't get too deep into this today, but basically, the LFO makes automatic adjustments to either the amplitude (loudness) of the sound, the filters, or the Panning (left-to-right movement). Try adjusting the settings and see what it does! Note: in order to hear the LFO working, you will need to turn up the Amount knob!
  11. Lastly, try connecting different FX devices to the NN19. Specifically, I suggest that you try the Scream Distortion or the Delay devices. Or both. Go nuts!
  12. Complete a beat that incorporates your guitar sound.
  13. Be sure to do File>Save Settings and check off all the samples.
  14. Save this as: your name_ADSR style.
  15. Put it in the Shared Media folder.

Thursday, March 18, 2010

{ADSR assignment (pt.1)_Making a Kick Drum w/ the Subtractor}

Now you're going to use the Subtractor to create an original kick drum sound. To do this, you will be working with a few different parts of the Subtractor, including the Oscillators, Filters, and ADSR envelopes. I don't want to overwhelm you with too much info before you get started with this, but here are a couple things that might help you make sense of what you're working with:

Oscillators
These are the heart of the Subtractor, meaning this is the section where the sounds are originally generated from. You have two Oscillators to work with, and you can change the basic types of sound waves to create different combinations of sounds to work with. Note that if you want to use both Oscillators, the light next to OSC 2 needs to be lit up!

Filters
We already worked a bit with filters last week. Remember, they let you remove different areas of the frequency spectrum (i.e. highs, lows, mids, etc.) We've got four basic types of filters to choose from, and they all reject different parts of the frequency spectrum. They are:
  • Low Pass (LP)
  • High Pass (HP)
  • Band Pass (BP)
  • Band Stop (aka "Notch")
Remember, the key word here is "pass"; what frequencies are being allowed to pass through the filter. In a Low Pass filter, the "lows" are being allowed to "pass". In a High Pass filter, the "highs" are being allowed to "pass". You can adjust the Cutoff frequency (the point where the filter starts working) by dragging the slider called Freq. So, in Subtractor, you can select whichever filter you want to work with by clicking on the red dot next to it.

ADSR
As we just discussed, ADSR controls how a sound evolves over time. However, you will notice, that there are actually 3 ADSR envelopes in the Subtractor: one for the Amplitude (the actual sound), one for the Filters, and one called Mod. I don't want to overwhelm you, but let's just say they all work in the same way, adjusting how quickly something kicks in and cuts off. For example, with the Filters, you might have a slow Attack time on the filters that doesn't kick in until after the sound has already started playing. You can get some really interesting and original sounds by messing with these.


Let's jump into this. Please do the following:
  1. Open Reason and start a new session.
  2. Create a Subtractor.
  3. Right click on the folder button to Initialize the patch.
  4. On Osc 1, select the sine wave. Set the Octave ("Oct") to 1.
  5. Make sure the Keyboard Tracking light is off.
  6. Find the Phase knob under Osc 1. Now find the three red lights to the right of the knob and click on the one next to the "-".
  7. Turn the Phase knob all the way to the right. (This is basically going to thicken up the sound.)
  8. Turn on the Noise generator and set the Decay to 40, Color to 0, and Level to 98.
  9. Go to the Filter 1 section and set the Frequency Slider to 64. Select the filter called LP12 by clicking the light next to its name.
  10. Now go to the Filter Envelope section and set A=0, D=40, S=0, and R=38. Turn the Amount knob to 65.
  11. Go to the Amp Envelope section and set A=0, D=34, S=0, R=40.
  12. Go to the Mod Envelope section and set A=0, D=36, S=0, R=30. Set the Amount knob to 70. Make sure that the Envelope Destination is Osc1.
  13. And you're pretty much done. Click on the Save Patch button and save this to your folder as "your name_My Kick.zyp".
  14. Open your BAVC gmail account and email me (crunde@bavc.org) your patch as an attachment.
  15. Now listen closely to this sound. Is there anything you'd like to change about it? What section of the Subtractor do you think you can adjust to get it to sound the way you want? Make any changes you feel are necessary and save it again.
  16. Start working on a song that uses your kick drum. Save it as: your name_ADSR style