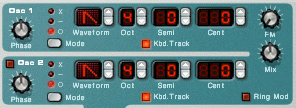
Oscillators
 These are the heart of the Subtractor, meaning this is the section where the sounds are originally generated from. You have two Oscillators to work with, and you can change the basic types of sound waves to create different combinations of sounds to work with. Note that if you want to use both Oscillators, the light next to OSC 2 needs to be lit up!
Filters
 We already worked a bit with filters last week. Remember, they let you remove different areas of the frequency spectrum (i.e. highs, lows, mids, etc.) We've got four basic types of filters to choose from, and they all reject different parts of the frequency spectrum. They are:
Remember, the key word here is "pass"; what frequencies are being allowed to pass through the filter. In a Low Pass filter, the "lows" are being allowed to "pass". In a High Pass filter, the "highs" are being allowed to "pass". You can adjust the Cutoff frequency (the point where the filter starts working) by dragging the slider called Freq. So, in Subtractor, you can select whichever filter you want to work with by clicking on the red dot next to it.
ADSR
 As we just discussed, ADSR controls how a sound evolves over time. However, you will notice, that there are actually 3 ADSR envelopes in the Subtractor: one for the Amplitude (the actual sound), one for the Filters, and one called Mod. I don't want to overwhelm you, but let's just say they all work in the same way, adjusting how quickly something kicks in and cuts off. For example, with the Filters, you might have a slow Attack time on the filters that doesn't kick in until after the sound has already started playing. You can get some really interesting and original sounds by messing with these.
Let's jump into this. Please do the following:
- Open Reason and start a new session.
- Create a Subtractor.
- Right click on the folder button to Initialize the patch.

- On Osc 1, select the sine wave. Set the Octave ("Oct") to 1.

- Make sure the Keyboard Tracking light is off.

- Find the Phase knob under Osc 1. Now find the three red lights to the right of the knob and click on the one next to the "-".

- Turn the Phase knob all the way to the right. (This is basically going to thicken up the sound.)
- Turn on the Noise generator and set the Decay to 40, Color to 0, and Level to 98.

- Go to the Filter 1 section and set the Frequency Slider to 64. Select the filter called LP12 by clicking the light next to its name.

- Now go to the Filter Envelope section and set A=0, D=40, S=0, and R=38. Turn the Amount knob to 65.

- Go to the Amp Envelope section and set A=0, D=34, S=0, R=40.

- Go to the Mod Envelope section and set A=0, D=36, S=0, R=30. Set the Amount knob to 70. Make sure that the Envelope Destination is Osc1.

- And you're pretty much done. Click on the Save Patch button and save this to your folder as "your name_My Kick.zyp".

- Open your BAVC gmail account and email me (crunde@bavc.org) your patch as an attachment.
- Now listen closely to this sound. Is there anything you'd like to change about it? What section of the Subtractor do you think you can adjust to get it to sound the way you want? Make any changes you feel are necessary and save it again.
- Start working on a song that uses your kick drum. Save it as: your name_ADSR style


No comments:
Post a Comment