Thursday, October 29, 2009

Keyboard Basics (pt 3)_Major Scale


Quick recap: how many different notes are there?

Now just because you have all these possible notes to work with, doesn't mean that they will all sound good with each other.

A scale is a set of notes that sound good with each other. They provide a frame for you to create melodies and help you to figure out different directions for your music.

The two most common scales in Western/American music are the Major and Minor scales. Generally speaking...
  • the Major scale sounds happy/upbeat. You hear it a lot in pop music.
  • the Minor scale sounds more sad or intense. You hear it a lot in hip hop and other harder styles of music.
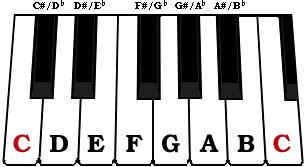
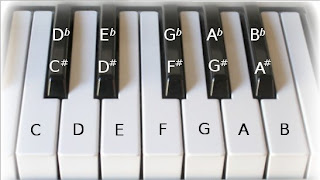
Scales are created by the way the notes are spaced out on the keyboard. Take a look...


When two notes are right next to each other, it is called a half step (for example C to C#).
When two notes have a note in between them, it is called a whole step (for example, C to D).

How much space is in between G and A? E and F? Eb and F?

OK, so now that we know about whole steps and half steps, I'm going to reveal to you the formula that will let you make a Major scales from any key on your keyboard...

Major scale formula:

W-W-H-W-W-W-H

Once you know the formula for a scale, it doesn't really matter what key you start on. You can always make the kind of scale that you want. Today, we are only focusing on the Major scale, so let's hear for ourselves what I'm talking about...

Please do the following:

Part 1
Fill out the G Major scale worksheet. First find and label G, and then fill out the rest of the notes in the scale by using the formula:

W-W-H-W-W-W-H

Part 2
  1. Start a new Reason file.
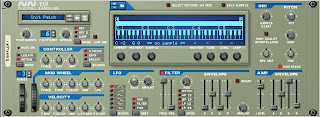
  2. Create an NN-XT Advanced Sampler.
  3. Load a patch from one of the main Orchestral families (strings, brass, reeds/woodwinds). Don't use any percussion instruments for this one, except from the folder called Mallets.
  4. Set your Loop Markers so that L is on Bar 1 and R is on Bar 5.
  5. Make sure that the Loop On/Off and Click buttons are lit up.
  6. Hit Play and listen to the Tempo.
  7. Looking at your worksheet, practice playing the G Major scale in time with the click - each note should be played on a click!
  8. Adjust the Tempo to whatever is comfortable for you; if it is too fast, slow it down!
  9. When you are confident about playing it, go ahead and hit the Record button and then Play to start recording. Remember to wait for the Playhead to loop back before you start playing.
  10. Save it as: your name_GMajorScale
  11. Show one of the instructors before moving on.
Part 3
  1. Start a new Reason file.
  2. Create a Redrum.
  3. Make a 32-step drum beat and use Copy Pattern to Track to put it in your Sequencer.
  4. Click the Pattern Button to turn make sure you don't hear a double of your beat.
  5. Create an NN-XT Advanced Sampler and load a sound you like.
  6. Come up with an original melody using the G Major Scale - you can ONLY USE notes from G Major!!!
  7. Create 2 additional instruments (NNXT, NN19, Subtractor, etc.) and create additional parts to your song.
  8. Save this as: your name_GMajorBeat

More Samples and Breakbeats


So, on Tuesday we saw the documentary film, "Copyright Criminals" and talked about the history of sampling in hip hop.

What were some of the issues about sampling that were raised in the film? Now that you've learned a little more about the history of sampling and heard from some of the different people involved in the debate, how do you feel about sampling? How would you feel about someone sampling your music and possibly making money off of it?

However you personally feel about the practice of sampling, it is generally acknowledged that sampling and using loops has made a huge impact on the way modern popular music is produced. Hip hop is the obvious example, but as hip hop became more mainstream, it also started to impact other genres like R&B, pop and rock. Sampling also was one of main foundations for a lot of different electronic music styles (techno, house, jungle, etc.).

Here's a quick example of sampling in a big rock hit:

"Bittersweet Symphony" by the Verve....


...used a sample of this cover version...


...of the song, "Last Time" by the Rolling Stones...


...who probably were "inspired"by the song, "This Could Be the Last Time" by the Staples Singers:


So, the Rolling Stones actually sued the Verve for using the sample. The question is, who really owned the rights to that sample?

Anyway, quick recap...

The breakbeat was popularized by DJ Kool Herc, who figured out that by having two copies of a record, he could extend the drum solo (aka "break") for as long as he wanted; first he would play one record, then the other, then rewinding the break on the first record, etc. In DJ language, this is called beat juggling. Here's an example of beat juggling by DJ QBert:


A few years later, when samplers became affordable and had long enough sampling times, people were able to just record the breaks into the samplers and have them loop automatically for however long they wanted. In addition, people started being able to sample all kinds of different sounds and add them to their beats and really create something completely new out of anything in their record collections.

Today we're going to get into working with that famous break from the James Brown song called "The Funky Drummer".

Let's listen to the original for a second and give some respect to Clyde Stubblefield, the drummer who actually performed this piece of music history...


So now we're going to work on getting the break into our own songs so that we can use it.

But first...

Disclaimer: Sampling and distributing pieces of other artists' work without their permission is a violation of copyright laws. If you are merely sampling for educational purposes, as we are doing in this class, then you should be fine. But remember that if you intend to distribute and/or sell music that incorporates samples of other artists' work, you are legally required to get all necessary permissions from the owners for the use of those samples. BAVC in no way condones or advocates the unauthorized use of intellectual property.

That said, let's learn a little bit about music history by working with the world's most sampled drum break...

  1. First, let's grab the audio file called, "Funky Drummer_break.wav". Copy that into your folder on your hard drive.
  2. Start a new file in Reason.
  3. Create an NN19 Digital Sampler.
  4. Click on the Browse Sample button at the top of the NN19.
  5. Load the Funky Drummer_break file into the sampler.
  6. So what we've got here is a 1-bar drum break. In order to make it line up with everything else in your song, we've got to make the tempo of the song fit with the tempo of the break, so...first, set your L and R markers so that they are marking off a single bar (put the L on Bar 1 and R on Bar 2).
  7. Now hit Shift-Tab on your keyboard to go into the Edit View of your NN19 sequencer track (the part that shows the keyboard and notes).
  8. Click on the Pencil Tool.
  9. Find key C3 and draw a note that is exactly one bar long.
  10. Make sure the Loop On/Off button is lit up, then hit play and listen to the loop. What is happening?
  11. Now let's adjust the tempo so that the sample loops perfectly...Lower the tempo until you get down to 101 BPM. Sounds good, right?
  12. OK, so now we've got something that we can work with.
  13. Switch back to the Arrange View (hit Shift-Tab).
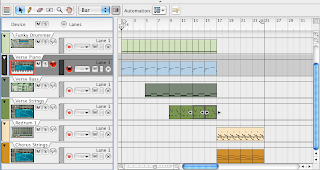
  14. You should now have a box called a region that looks like this:
  15. Copy the region out for 16 bars so that it ends on Bar 17.
  16. Save this as: your name_breakbeat

Once you've got the Funky Drummer loop for 16 Bars, please do the following:
Create a song that is at least 24-Bars long that incorporates both the drum break and your own original Redrum drum pattern (32-steps).

Tuesday, October 27, 2009

Sampling: Copy, right?

Today, we're actually going to be taking a field trip and learning about the world of sampling and copyright in music. But first, a couple things...

  1. MAKEUP LAB - since a few folks have already been missing classes due to illness, doctors' appointments and family stuff, I am scheduling the first makeup class for this Friday, October 30, 3:30-7:30 pm. If you have missed any classes so far, I highly recommend that you come to this so that you can take care of those hours you've missed. Remember...you will not receive your stipend unless you have covered all your hours.
  2. I still need paperwork from a bunch of folks! If you aren't sure what you're missing, or what you need to do, come see me after class/during the break. I don't like to make threats, but at some point I have to tell people that they can't come to class because I don't have their paperwork. Let's not get to that point...
  3. I need everyone to do a quick online survey about this class. It's not a test, just a way for us to gauge how much information you already have when you start this class and then how much you've learned by the end. Click here to take the survey.

OK, so sampling...

Thursday, October 22, 2009

NNXT_Sounds of the Orchestra

So today I want to talk a little bit about the different families of instruments that you can find in an orchestra and get familiar with the types of sounds that are available to you through Reason instruments, such as the NN19, NNXT and Combinator. Keep in mind that just because orchestral instruments are traditionally used to play classical music, that doesn't mean that they can't be incorporated into hip hop and other forms of music. Here is an example of a famous beat that combines orchestral sounds along with more modern sounds like synthesizers, drum machines, etc.:

Whats The Difference (Instrumental) - Dr. Dre, Xzibit, Eminem

An orchestra is just a group of instruments, usually grouped together to play classical music. The size of an orchestra can range from under 50 musicians to over 100. Take a look at how the orchestra is laid out in the diagram above. Why do you think the different categories of instruments are placed where they are?

You should be aware of this general rule:

The larger an instrument is, the lower the pitch of the sound it can make. The smaller the instrument, the higher the pitch.

For our purposes, I just want you to know the four main families of instruments found in an orchestra because it will help you to know where to look for certain types of sounds when you are making your own music.

The four families of orchestral instruments are:
  1. Strings - These are all the instruments that have strings. They are usually played with a bow, though sometimes they can also be plucked. Instruments in the string family typically include double basses, cellos, violas and violins. You could also throw guitars and harps into this category.
  2. Brass - These are metal instruments that you blow into. They tend to be extremely LOUD with a sharp tone that can cut through all the other instruments! Common instruments in the brass family include tubas, trombones, french horns and trumpets.
  3. Woodwinds (aka "Reeds") - These are also instruments that are blown into, though unlike brass, they make sounds by having a thin wooden reed in the mouthpiece that vibrates when you blow on it. Most woodwind instruments (but not all) are made out of wood and have a mellower sound than brass instruments. Common woodwinds are oboes, clarinets, bassoons and flutes. Interestingly, saxophones also are considered woodwinds. Why is this interesting?
  4. Percussion - These are instruments that you bang on, either with your hands or special sticks! Typically, they are used to make really loud statements at certain parts of the music. They include all kinds of drums and cymbals and gongs, but they can also include melodic instruments like xylophones and glockenspiels, which are played with sticks called mallets.


Now let's hear what a whole orchestra playing together can sound like...


Assignment:


Real simple. You're going to make a beat that uses instruments from each of the orchestral families of instruments using the NNXT Advanced Sampler.
  1. Open Reason and start a new file (File>New)
  2. Create a Redrum quickly make a beat (32 Steps please!)
  3. Create 4 NNXT Advanced Samplers
  4. Load sounds from each of the 4 orchestral families and make a beat that is at least 24 bars long. Only use sounds from the following folders: Brass, Mallets, Orchestral, Reeds and Pipes, Strings.
  5. Save it to your folder as: (your name)_Orchestra
Having trouble knowing where to start? Keep in mind that just because you're using orchestral instruments, it doesn't mean that you have to write a symphony! You're still just making beats here. Here are a few tips on where to start.
  • Start by browsing through different sounds until you find one that sounds cool and get inspired by that. Make a main melody using that sound and just add little touches with the other instruments
  • Try changing the octave on your keyboard to change the pitches of the sounds. Certain instruments (like flutes and violins) sound better in higher octaves, while others (like tubas and cellos) sound better lower.
  • Strings tend to be good for making long, rich sounds. Try holding the keys down for a while.
  • Brass tends to be better for short, sharp sounds. Try playing quick little hits on the keys.
  • Reeds can go either way. Try playing either short or long notes and see what sounds better.

Keyboard Basics (pt 2)_Black Keys


Last class we took some time to learn about the white keys of the keyboard.


How many different notes are there? What are their names?

So, today, we're going to talk a little bit about the remaining notes - the ones on the black keys.

The black keys don't have their own letters like the white keys do (ABCDEFG). Instead, the black keys are named by where they are in relation to the white keys.

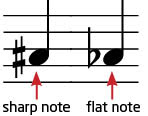
A black key that is to the right of a white key is called a sharp.


A black key that is to the left of a white key is called a flat.

Here are the symbols of sharps and flats:
Here is what they look like on an actual keyboard:
Do you notice anything interesting about the names of the black keys?

Here is the important thing:

Black keys each have two names because they are always to the right of one white key and to the left of another.

Confused? It's actually not so tricky. Think about it...

There is black key in between F and G. If you're going up from F, then it is called F sharp. If you're going down from G, then it is called G flat.


Assignment
  1. Open Reason and create a new file.
  2. Create a Redrum and load some sounds into it (bass, snare/clap, hi hat, percussion, etc.)
  3. Make a 32-step drum beat.
  4. Set your L marker to Bar 1 and your R marker to Bar 17.
  5. Use Copy Pattern to Track to put the beat into the Sequencer.
  6. Now, click on Pattern 2 and make a 2nd drum beat (16-step is fine).
  7. Move your L marker to Bar 17 and your R marker to Bar 25.
  8. Use Copy Pattern to Track to put the beat into the Sequencer.
  9. Now Create a NN19 Digital Sampler.
  10. Click on the Browse Patch button and load any sound into it that you like.
  11. Move the L marker back to Bar 1 and the R marker back to Bar 5 and hit Play to listen to your beat play back.
  12. Using only the black keys on your keyboard, come up with a melody to go with the beat. When you've got it down, record it.
  13. Use OPTION-drag to Copy out your melody so that it ends on Bar 17.
  14. Now move your markers so that the L is on Bar 17 and the R is on Bar 25.
  15. Create a 2nd NN19 Digital Sampler and load a different sound into it.
  16. Again, using only the black keys, come up with a second melody and record it.
  17. When you're done, move the L marker back to Bar 1 and play the whole thing back from the start. Sound good?If not, what can you do to make it better?
  18. Add any other instruments that you like.
  19. Save this as: your name_black keys

Tuesday, October 20, 2009

Keyboard Basics (pt. 1)_White Keys


Congratulations! After a couple of weeks of learning how to use the Redrum and Dr. REX, we are all getting pretty good at making drum beats and working with loops.

Now we're ready to start looking at the other cool instruments and playing some of the instruments live with our Oxygen 8 keyboards.

There are two goals for today:
1) Learn the white keys of the keyboard
2) Learn how to create an NN19 Sample Player and load sounds into it.


Keys of the Keyboard

OK, here's one thing you need to understand: there are only 12 notes that you can play!

Here is what they look like:


Now, you may be thinking, "But I've seen a piano before and I know they've got a lot more than 12 of those things on them". Take a look at this picture of a full sized piano keyboard:
Notice any patterns?

So, basically this whole keyboard is made up of sets of these 12 notes repeating. A set of notes is called an octave. As you go to the right, the pitch gets higher, as you go to the left, the pitch gets lower, but there are always just 12 notes.

"What are the names of these notes, Chris?" you ask. Super easy...

  • The white keys are just the first 7 letters of the alphabet (A-B-C-D-E-F-G) repeating over and over.
  • The black keys are extra things called sharps and flats.
We'll talk more about the black keys later, but for now lets concentrate on the white keys:
What is the name of the first note on the left? What happens when you go 12 notes to the right? What do you think the next white note to the right will be?

So, if you play each of these white keys in order, from C to C, you will be playing what is called the C Major scale. We will be working on this tomorrow but for now, just REMEMBER...

The white keys are just the first 7 letters of the alphabet (A-B-C-D-E-F-G).

The NN19

Like the Dr. REX, the NN19 is a type of instrument called a sampler. It lets you load the sounds of all kinds of instruments and play them with your keyboard. The difference between the Dr. REX and the NN19 is that the Dr. REX is more specifically designed to work with loops, while the NN19 is more for playing instruments "live".

So, let's just jump in and start working with the NN19...

Assignment 1

  1. Start a new Reason session.
  2. Make sure you see a Mixer 14:2 at the top of your rack.
  3. Set the Tempo to 80 BPM.
  4. Create an NN19 Digital Sampler (Create>NN19).
  5. Click on the folder button in the upper left corner of the screen.
  6. Now let's load a patch called "Bright Piano"...Go to Reason Factory Sound Bank>NN19 Patches>Pianos and Keyboards>Bright Piano.smp.
  7. Now when you play some notes on your keyboard, you should hear the sound of a piano. If you don't, raise your hand and an instructor will help you.
  8. Make sure the L marker is on Bar 1 and the R marker is on Bar 5. (You may need to zoom in on the Sequencer to see the right numbers.
  9. Make sure that both the Click and the Loop buttons are lit.
  10. Hit Play and listen to the tempo of the click.
  11. Practice playing the C Major scale up and down in time with the click - each note should be played on the click. If you need to, feel free to slow the tempo down.
  12. When you are ready, hit Record and record yourself playing the scale up and back. Don't forget to wait to start playing at Bar 1!
  13. Hit Stop when you are finished.If you don't like your performance, delete it and do it over. Keep working until you get it right!
  14. Save this as: your name_CMajor.
  15. Raise your hand and have one of the instructors come and check out your work before you move on to the next assignment!

Assignment 2

  1. Start a new Reason session.
  2. Create a Redrum Drum Machine.
  3. Load at least 4 sounds into the Redrum (Kick, Snare/Clap, Hat, Percussion, etc.)
  4. Make a 32-step drum pattern. (Ask an instructor if you don't remember how to do this.)
  5. Put the L marker on Bar 1 and the R marker on Bar 17.
  6. Use Copy Pattern to Track to put your beat into the Sequencer.
  7. Click on the Pattern button to turn the beat off in the Redrum.
  8. Now move the R marker back to Bar 5.
  9. Make sure the Loop button is lit.
  10. Hit Play to listen to your beat playing.
  11. Create an NN19 Digital Sampler.
  12. With the beat playing, click on the Browse Patch button and try to find an instrument that sounds good over your beat.
  13. Try to come up with a simple melody (at least 3-4 notes) and practice playing it along with your beat.
  14. When you are ready, hit Record and record your melody. Keep working at it until you get it sounding cool.
  15. When you get it down, Copy the melody out so that it ends on Bar 17 at the same point as your drums. The easiest way to do this is to hold down the OPTION button on your keyboard and drag the melody region to the right.
  16. Now move the markers so L is on Bar 17 and R is on Bar 25.
  17. In the Redrum, turn the Pattern button back on and click on Pattern 2.
  18. Make a second 32-step drum beat.
  19. Use Copy Pattern to Track to put it in the Sequencer (Bar 17-25).
  20. Create a second NN19 Digital Sampler.
  21. Load another sound and record a new melody for this part.
  22. When you've got it down, move the L marker to Bar 1 and listen to the whole beat.
  23. Save this as: your name_NN19.
  24. Add anything that you think would make the beat more exciting (another Redrum, Dr. REX Percussion Loop, another NN19, etc.). Feel free to experiment with some new instruments.
  25. Let an instructor check it out!!!