Thursday, December 17, 2009

Family Night!


Welcome to Family Night for the Digital Pathways Advanced Audio class.

Please make yourself comfortable and feel free to grab some refreshments from the table. We hope you'll take time to go around to the different stations and listen to the different projects we have been working on in this class. If you have any questions, feel free to come up and talk to Chris or Quinn.

Thanks for coming out!

Tuesday, December 15, 2009

Recording Project_Who Are You (pt. 3)

Reminder: Family Night is this Thursday, Dec. 17.

Bring a family member, bring a friend, bring anyone you want to share your work with. Light refreshments will be served!

Final Makeup Lab: Friday, Dec. 18

If you need to makeup hours and you want to continue with this class after the break, you need to come to this!


Today, we are going to focus on getting our work ready for Family Night. By the end of the day, everyone must turn in the following things:

  1. The Pro Tools session folder for your completed "Who Am I?" projects. (including an appropriate beat, clean edits of your recording, with the recording arranged well with the beat).
  2. 2-3 COMPLETE songs (containing complex song structure, interesting instrumentation)
You must have Quinn check off your work before you turn it in! When he has approved it, please put a copies in: Shared Media>dolly>Student Work>Family Night>(your name)


Before I let you get to work, I want to take a quick minute to talk about how all the information and media is stored in Pro Tools. This is very important to know when you start moving sessions from place to place, as you will be moving your sessions onto the Shared Media folder today.

Pro Tools Folder Hierarchy
When first start a new session, this window pops up:

What you are doing in this window is deciding a couple of things:
  1. The name of the session
  2. What quality (Sample Rate, Bit Depth) you want your session to be (higher resolution = more CPU and memory required)
  3. What file format (AIF, WAV, MP3, etc.) you want the audio to be
  4. Where on your hard drive you want to store the session
Then, once you hit "Save", Pro Tools creates a new folder containing some specific things. Take a look...
Here is the folder for my new session.If I go inside this folder, this is what I will see.

So what is all this stuff?
  • Pro Tools session file - this is the actual "file" that you open to work with Pro Tools. However, it doesn't actually have any audio in it. It's just a window that lets you work with files that are actually located somewhere else - sort of like one of those remote controlled robots that astronauts use.
  • Audio files folder - this is where all your recordings and imported audio is actually saved. This is folder is actually more important than the Pro Tools session file
  • Session file backups - Pro Tools periodically does an automatic save for you, just in case your computer crashes, or some catastrophe hits. You can load these files to recover your work.
  • Wavecache - This is basically a file that contains a picture of what you are supposed to see in your Edit Window.
  • The other folders (Region Groups, Video Files, Fade Files) you don't need to worry about at this point. They all store information related to specific processes in Pro Tools that we will get to later. Just be aware that they are there!
The most important thing that you need to understand is this: a Pro Tools session file, which looks like this: is nothing by itself.

When you are trying to move or back up a copy of your Pro Tools session, you must copy the entire folder that contains all the other folders inside it, especially the Audio Files folder!!!

Thursday, December 10, 2009

Recording Project_Who Are You (pt. 2)


Last time we did our first audio recordings in Pro Tools. Today you're going to actually work with those recordings and edit and clean them up. Then we'll import your music to your Pro Tools sessions and mix those two tracks together. Before we do that, let's talk a little about how Pro Tools is laid out and how you get around in the program.

First of all, Pro Tools has two main windows:

The 
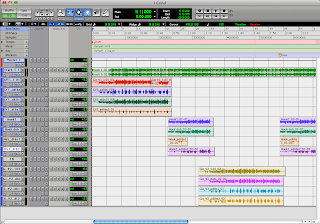
Edit Window is where you focus on recording, editing and arranging your tracks. It is easy to move things around and make quick adjustments to the regions in your session.

The Mix Window is where you focus on mixing, meaning adjusting volume levels, balancing sounds, and adding FX and dynamics processing.


So today we're going to be editing our audio. Which window do you think we're going to be primarily working in?

Tools
In the Edit Window, there are are a set of different tools for you to use to get around and do what you need to do. The toolbar is located at the top of the screen and looks like this:
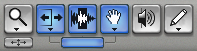
The tools are:

Zoomer Tool - Lets you zoom in and out around a particular area within a track. Just click and drag around the area you want to see. To zoom out, hold down the OPTION button on your keyboard.

Trim Tool - Lets you adjust the left and right sides of an audio region to quickly get rid of the parts you don't need. It is non-destructive though, so if you want to bring something back, you can just click and drag it back out.

Select Tool - Lets you position the playback cursor or select an area for playback/editing.

Grabber Tool - Lets you grab a whole region and move it around.

Scrubber Tool - Lets you "scrub", or listen closely to a piece of audio by clicking and dragging the cursor over it. Sounds really cool (like a turntable), but unfortunately you can't easily record it!

Pencil Tool - Lets you get in and redraw the waveform data. You mostly use this to repair little pops and clicks in your audio. However, this is a destructive process (meaning you can't undo it), so you should be very careful with how you use it.

And one last tool you should know about...

Smart Tool - Gives you the functions of the Trim, Selector and Grabber tools all at once. You move between these tools by moving the cursor over different parts of the region. In addition to the functions of the tools listed above, the Smart Tool also allows you to do Fades, which we will cover later.


So, now we're going to get into working with these tools to clean up our recordings from the last class.

Part 4 - Edit your recording
  1. Find your Pro Tools session folder in your folder on the Shared Media drive.
  2. Copy it to your folder in your computer.
  3. Find the folder on your your hard drive.
  4. Double-click on the Pro Tools session file to open it.
  5. Listen to your recording and pay attention to the little details that don't sound good (little breaths, paper rustling, repeating the lines.
  6. Make sure you are zoomed in close enough to actually see what's going on.
  7. Click to highlight the Select Tool.
  8. Find a spot that you want to clean up and click and drag with the Select Tool to highlight the area.
  9. Hit Delete on your keyboard to get rid of it.
  10. Do this with all the areas that you want to clean up.
  11. Click to highlight the Trim Tool.
  12. Go to each of the areas you deleted and make any small adjustments to make it sound clean - no cutoff sounds!
  13. Save your session (File>Save).

Part 5 - Finish and Export your beat from Reason
What is Exporting, and why do you need to do it?

Right now your songs are Reason files (*.rns). They only play back in Reason. You can't burn them to a CD, you can't listen to them in iTunes, you can't upload them to Myspace/imeem/etc., and you can't directly open them in Pro Tools. You can only open them in Reason.

In order for you to do all the things I just mentioned, you need to convert the song into in audio file. Super simple...

  1. Quit out of Pro Tools.
  2. Open your Reason session.
  3. Finish your beat and make sure everything sounds right.
  4. In the Sequencer Window, scroll to the right until you see the little E.
  5. Drag it back so it's right at the end of your song.
  6. Now go to File>Export Song as Audio File.
  7. Change the filename and make sure that you are saving to your folder. A little window will pop up. Save this as: your name_WhoAreYou
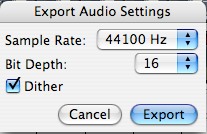
  8. Make sure it the settings are Sample Rate = 44,100, Bit Depth = 16, then click Export.
  9. Quit out of Reason.

Part 6 - Import your beat into Pro Tools
  1. Open your Pro Tools session.
  2. Go to File>Import>Audio
  3. In the Window that pops up, find the file you want to import and click Convert. Then click Done.
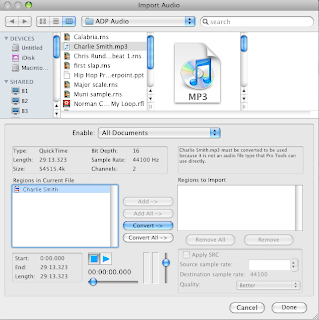
  4. PT will ask you to select a Destination Folder where the new audio file will be stored. 9/10 times, it will automatically select the Audio Files folder for you. This is where you want to put this audio file.
  5. Lastly, Pro Tools will ask you where you want to put this new file in the actual session. You can either put it in the Region Bin, or you can create a brand new track for it. For now, just select New Track and click OK.

Tuesday, December 8, 2009

Recording Project_Who Are You (pt.1)

Today we are going to shift gears in this class and get into the world of recording and working with audio. But what the heck is "audio" anyway? There are a few definitions. According to Wikipedia:

"Audio
may refer to:
  • Sound that is capable of being heard
    • Sound recording and reproduction
    • Natural acoustic audio
    • Audio frequencies "
So, generally we're talking about sound. But more specifically, for the purposes of this class, when we talk about audio, let's say that we're mainly referring to sound recording and reproduction. OK, so how do we actually record and reproduce sound?

That's actually a very big question that we will be exploring throughout this class. But let's start with this: Pro Tools.

In this class, we will be working a lot with a certain piece of software called Pro Tools. Pro Tools is made by a company called Digidesign. There are two versions of Pro Tools: Pro Tools HD (the professional version) and Pro Tools LE (the consumer version). They work in basically the same way, there are just some advanced features that are available in HD that are not available in LE. All of our workstations are LE versions.

Pro Tools is an example of what is called a Digital Audio Workstation (DAW). A DAW is a piece of software that gives you the main functions of a recording studio on your personal computer:
  • It lets you record
  • It lets you edit
  • It lets you mix
Pro Tools is currently the most widely used DAW on the market. It is not the only one, though. Logic, Nuendo, Cubase and Sonar are just a few examples of other DAWs that many peope use and some prefer over Pro Tools. They generally all do the same things, just in slightly different ways. Later in the course, we will be getting into using Logic Express just to see what other types of software are like.

There are a couple of pieces of equipment that we are going to be working with today. I would like for you to know these four terms before you leave today:
  1. Microphone (Audio Technica 2020)- a device that turns sound waves into an electrical audio signal.
  2. Hardware Interface (Mbox2/Digi 003) - a piece of equipment that converts electrical audio signals into digital information that the computer can work with, and converts digital information into audio. Think of it like this: all sound going in or coming out of the computer must go through the interface.
  3. DAW software (Pro Tools 7.4.2) - software that lets you record, edit and mix audio.
  4. Monitors (Sony headphones, Genelec 1030A) - equipment that allows you to listen to ("monitor") your audio.
So, for our first recording project, everyone will get the experience of being both in front of the microphone and acting as the engineer running Pro Tools. This project has a couple of different steps, so please pay attention and ask questions if you are unclear about everything.

Part 1
  1. Look on the Shared Media drive in the Class Materials folder and find the files called Who Are You_writing assignment.odt and Who Are You_sample.odt
  2. Copy these files to your folder on your computer.
  3. Open the file Who Are You_writing assignment.odt
  4. Type up the your answers to all the questions. Please use complete sentences, since you are going to be recording yourself reading these answers. If you aren't sure what to write, open the file Who Are You_sample to get some ideas.
  5. When you finish typing, go to File>Save As and save the document to your folder. Call it: your name_Who Are You
  6. Once it is save, please put a copy into the folder with your name on the Shared Media drive.
Part 2
Have someone record you reading your "Who Are You" statement. Chris will be calling you up in pairs to work on this. Be ready to read and engineer!

Part 3
Compose an original beat in Reason to go along with your statement. It should go along with the feeling of your statement. This is meant to be a soundtrack that reflects who you are, so put some thought into it and use all the things you've learned about making beats so far (structure, major/minor key, FX, etc.). This beat should be approximately 2 minutes long.

Tuesday, December 1, 2009

Important Dates and Info

Couple of important dates to be aware of:

Wed., Dec. 2 - Digital Pathways Mixer, 5pm-7pm
(at 2727 Mariposa - see below)

Thurs., Dec. 3 - Makeup Class

Thur., Dec. 17 - Family Night!!! (last class before winter break)

Tues., Jan. 12 - first day of class after the break


Coming to the main BAVC office.

BAVC is located at 2727 Mariposa St.

View Larger Map


Coming from the East Bay:
  • Take BART to 16th/Mission station
  • Walk east on 16th St. , (or take the 22 or 33 bus) to the corner of Bryant St.
  • Turn right and walk south on Bryant St.
  • Stop at the corner of Bryant and Mariposa St. (look for a Starbucks)
  • Come in the door at 2727 Mariposa St. and come up to the 2nd floor.Congratulations, you made it to BAVC!
Problems? Call the front desk (415-558-2102) and someone will be happy to help you. Or call Chris' cell phone.

See you there!

Song Arrangement


Today we're going to talk a little bit about what is called "arrangement" in music. 

Arrangement is basically the order of when the different instruments come in. You could call this the "pacing" of your song. When you have several different melodies and rhythms happening in one piece of music, then you need to start deciding what goes where. And, critically, you need to decide WHY. Why would you have the bass drop right at that part? Why would those strings come in right there? Why does that flute right at that part make the whole song come together. According to Wikipedia:

 A satisfactory musical arrangement will most likely (ibid, p.4):
  • Provide "contrast between high and low sounds"
  • Avoid heavily doubled parts with an emphasis on solo sections
  • Be "sufficiently transparent to allow the musical lines to be clearly heard" and
  • Not have all the instruments playing throughout.

Let's check out two quick examples and pay attention to what instruments are coming in at different points of the song:


Please do the following:
  1. Look in the Class Materials folder on the Media Share folder and find the Reason file called KickPush.rns.  (dolly>Class Materials>KickPush.rns). DO NOT OPEN IT!
  2. Copy the file to your folder in Documents.
  3. Now open it. You should see this:
  4. Move each part so that one starts right after another.
  5. In the Sequencer section, label the tracks in the following order:  Intro - Verse 1 - Chorus 1 - Verse 2 - Chorus 2- Verse 3 - Chorus 3.
Before you start to make a beat, take a minute to just listen to the lyrics. Think about what this song about. What kinds of sounds do you think would be appropriate to go along with the lyrics. Where in Reason can you find the sounds that you want? When you are ready, please do the following:
  1. Create a Redrum and make a 32-Step drum beat.
  2. Create at least 4 additional instruments (only 1 Dr. REX) and record some melodic parts. Some should be low (bass) sounds and some should be high (treble) sounds.
  3. Copy the different parts out so that you have enough instruments for the entire song.
  4. Adjust the arrangement, so that the energy and excitement changes throughout the song.
  5. Save this to your folder as:  your name_KickPush