Thursday, January 28, 2010

{Friday Night (pt.1)}


Today and next week we're going to be working on an assignment on the topic of "Friday Night".

KQED, the Bay Area's public television and radio station is holding a contest in their Youth Perspectives series. And I want to have you folks create entries for it. The deadline for the contest is February 8, so we need to be finished with these by the end of next Thursday. This assignment is due by the end of class on Thursday, February 4.

Here are the official details for the contest: link

"What's in it for me?" you ask. Well, the grand prize winner gets an iPod Touch and, more importantly, will have their piece broadcast to a huge audience on the radio. More importantly still is the opportunity for us to use the skills we've been developing to actually create work for a specific project, rather than just our own personal enjoyment.

So, here's how this will work...

Part 1
We're going to do this interview-style. Each one of you is going to come up and get in the booth. The person engineering for you is going to interview you about your Friday night experience. The main interview questions are below, but here's the catch: it is the engineer/interviewer's responsibility to get good content, so he/she can also ask you whatever additional questions he/she wants in order to get you to provide insightful responses.

When you are finished recording, the engineer will transfer the Pro Tools session to your folder on the Shared Media drive.

Part 2
  1. Copy the Pro Tools session to your folder on your computer.
  2. Open it up and use your editing skills to turn the interview into one smooth statement. (We only want to hear the voice of the person being interviewed, not the engineer!)
  3. The whole statement should be between 1:30 - 2:00 min. long.
  4. SAVE!!!
Part 3
  1. In Reason, create music to go underneath your interview. As we had discussed earlier, the music should fit the mood of your Friday night (party? chill? boring? dangerous?) and what you talk about in your interview.
  2. When you are finished, Export the song out of Reason as an audio file.
  3. Import the audio file into your Pro Tools session.
  4. Adjust the volume levels and to get a basic balance between your vocal and the music. For this project, it is crucial that the music is never louder than the vocal!
  5. Put a compressor on the vocal to make it sound really smooth. (We'll cover this next week.)
  6. If you want to, use automation to automatically adjust the volume levels to add some flow to the music. (We'll cover this next week.)
  7. Save your session.
  8. Bounce your final project out of Pro Tools. Name the file: your name_Friday Night
  9. Put a copy of the audio file in the Friday Night folder on the Shared Media drive. (dolly>Shared Media>Student Work>Friday Night)

Interview Questions
  • What is your name? How old are you? Where do you live?
  • What is Friday night all about to you?
  • What goes down on a typical Friday night for you? Be specific - where do you go? what do you do? where do you start? where do you end up?
  • Would you say that your F.N. is a typical experience for people your age? Why or why not?
  • Do you think that people have a stereotypical idea of what Friday night is supposed to be like? If so, what is it?
  • Is your F.N actually like this? How does that make you feel?
  • Do you look forward to Friday night? Why/why not?

Tuesday, January 26, 2010

Resume Workshop

Today we've got a special guest appearance from our amazing Internship Coordinator, Ms. Felice Archbold.

Felice is going to be working with us on getting our resumes together so that we can start to be able to communicate all our audio skills and other experience in a professional manner. No matter what industry you want to work in, resumes are one of the main keys to getting a job that you like. Sometimes, though, it's hard to know where to start when you need to put one together.

Not to worry! BAVC's got your back on this! By the end of this class, you will walk away with a resume that helps you explain to an employer why you are someone they should hire. So, please give Felice your attention today so that she can show you some of the secrets to putting together a resume that makes you shine.

Thursday, January 21, 2010

Song Discussion: "Them Belly Full"

Starting today, I want to start doing something new, where in each class we will listen to one song and analyze it using our understanding of the music production process. The goal is to pay attention to and learn about how some of the world's great artists have used the language of music to produce strong pieces of art. Specifically, we should be focusing on:
  1. The instrumentation
  2. The arrangement
  3. The lyrics
  4. The performance
Please watch and listen to a live performance of the song, "Them Belly Full" by Bob Marley.

Please note that Mr. Marley spoke what is called Patois, a common dialect of Jamaica. Patois is a form of English with strong African influences. In addition, in this song he also throws in some words and terms used by Rastafarians (not all Jamaicans are Rastafarians, by the way!). Sometimes it can be hard for non-speakers to make out all the words. Click here to check out the lyrics.

Questions:
  • What is he talking about? What is the message of the lyrics?
  • What kinds of instruments do you hear in the song?
  • How does the music work to support the message (or not)?
  • Do you think this is a successful piece of work? Does it get its message across?

Song Recording - Day 2


Today we will continue to record our songs and practice engineering. As mentioned in the last class, the following assignments are due today:
  • The MLK Speech
  • The Loop assignment
If you are finished with those 2 assignments, please do the following assignment:
  1. Think about the idea of "Friday Night". What do you do on a typical Friday night? What are the feelings that come to mind when you think about it? Where do you start, where do you end up?
  2. Keeping these thoughts and ideas in mind, start working on a beat (2 - 2 min 30 sec.) that could be the soundtrack to your Friday night.
  3. Use multiple instruments (at least 5-6) to keep it flowing. If you there are different parts to your Friday night, try to create different sections to your beat that go along with these parts.
  4. Save this as: your name_Friday Night

Tuesday, January 19, 2010

Song Recording - Day 1


Today, on this soggy January afternoon, we're going to start the process of recording some of our MCs, vocalists and instrumentalists in class. We will be working on this for the next few classes. The goals are:

1) To get a complete song recorded quickly and efficiently for each of our artists .
2) For all the non-performers in the class to get some experience engineering the recording sessions.

The way this will work is, each artist will have 1 hour and 15 minutes to get their sessions set up, record and then transfer the sessions to the Shared Media drive.

Artists
Before your session starts, you need to create a new Pro Tools session, import the beat you're going to be working with, and transfer it to your folder on the Shared Media drive, so that it can be quickly transferred to the Instructor Station.

Engineers
It is your responsibility to make sure the session is set up and ready to go (mics, cables, track inputs) and then goes smoothly. You are responsible for the quality of the recording (mic levels!!!) and for making sure that everything gets saved before the end of the session. You also must transfer the session to the artist's folder on the Shared Media drive before the hour is up.

If you are not working on a recording session, here is what you should be working on:
  1. Finish the MLK editing assignment from Tuesday, January 13. Turn in the Pro Tools session folder to Shared Media>Student Work>MLK Speech.
  2. Finish the Loop assignment. Turn in the Reason file (don't forget to do Song Self-Contain Settings!): Shared Media>Student Work>Funk Loop.
  3. Compose a new beat inspired by today's weather.

Thursday, January 14, 2010

{Makin' Loops}

We've been working on getting our editing skills down in Pro Tools. Today we're going to apply these skills to a common and useful music production technique: making loops.

Before we get into this, however, I want to take a minute to remind everyone that when you use samples and loops, you are taking someone else's work. If you intend to use this work in your own music - especially if you want to sell it - you are legally required to get permission from whoever owns the copyright. In this class, we will be using these samples for educational purposes only.

There are 4 main steps to how we will do this:
  1. Import audio files into Pro Tools.
  2. Edit a part of the audio into a perfect loop.
  3. Bounce the loop out of Pro Tools as a new audio file.
  4. Import the loop into Reason.

Part 1 - Importing audio files
  1. Look in the Class Materials folder and find the folder called Loop Songs. Drag it to your computer. (dolly>Shared Media>Class Materials>Loop Songs)
  2. Take a quick minute to listen to each of these and pick one that you want to work with.
  3. Open Pro Tools and create a new session (File>Create New Session).
  4. Make sure the Sample Rate is 44.1kHz and the Bit Depth is 16 Bit. Name the session: your name_loops.
  5. Import the audio file. (File>Import>Audio File)
  6. In the window that pops up, pick the track you want to work with and hit the Convert button. Then click Done.
  7. Next, Pro Tools will ask you where you want to save this file. It should automatically go to the Audio Files folder. Click Choose.
  8. Now, you need to decide where in your session you want the file to go. Select New Track and click OK.
  9. You should now see the file in your Edit Window.

Part 2 - Editing your loop

Now the real work begins...

First let's make sure we're setup to do this right.

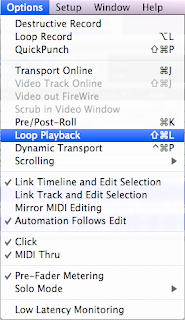
Go to the Options menu and click on Loop Playback. This will allow you to listen to a piece of audio in a loop. You can tell Loop Playback is on when the Play button looks like this:

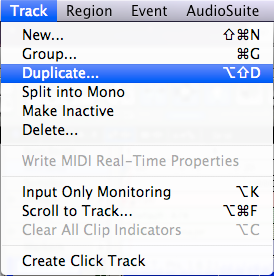
Now let's Duplicate the track so that we have a backup copy, in case something gets messed up...

Open the Track menu and click on Duplicate.

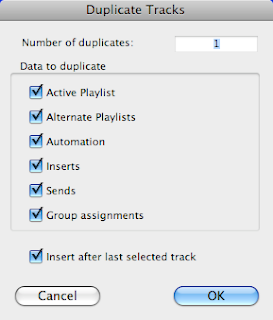
In the window that pops up, just click OK.

You should now have 2 copies of your track. Mute the first one by clicking the little M button below the track name.

Now we can begin editing...
  1. Listen to the song and find a part that you want to loop.
  2. Zoom in so that you can see the part clearly. You might also want to make your track height larger.
  3. Now you need to figure out how long - how many Bars - this section is. The trick is to listen for the snare. There are usually 2 snare hits or claps to each bar. I'm going to work with a 2-bar section.
  4. Let the song play and listen to your loop. Does it cut off too early, or does it catch the first beat of the next bar? Adjust the little blue arrows in the Timeline up top to make the loop longer or shorter.
  5. Now zoom way in on the beginning point of the loop until you can see just a single line of the waveform. Click on a point at the zero line crossing and hit Command-E on your keyboard to Separate the Regions.
  6. Now zoom out and then zoom back in on the end point of the loop and do the same thing.
  7. Zoom out and you should now see the two cuts at the beginning and end of the loop.
  8. Using the Grabber Tool, click on the loop to highlight it.
  9. Hit Play and listen to it loop.
  10. If it sounds off, zoom in and make adjustments with the Trim tool.
  11. When it sounds good, save your session as: your name_Funk Loop

Part 3 - Bouncing your loop
  1. Using the Grabber Tool, click to highlight your loop.
  2. Now Bounce this out of Pro Tools as an audio file. (File>Bounce to>Disk)
  3. In the window that opens up, make sure the settings look like this:
  4. Click Bounce.
  5. Name your loop (your name_loop) and pay attention to where Pro Tools is going to save it on your hard drive.
  6. Click Save.
  7. Save your Pro Tools session.
  8. Quit Pro Tools.

Part 4 - Importing into Reason
  1. Open Reason.
  2. Create an NN19 Digital Sampler.
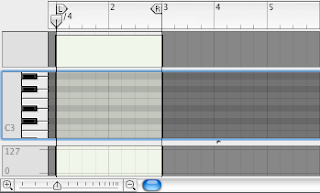
  3. In the Sequencer Track, move the L/R loop markers to match the number of bars of your loop. (e.g., 2 bar loop = L on Bar 1, R on Bar 3)
  4. Click the Toggle Mode button to switch to the Piano Roll View.
  5. Using the Pencil Tool, click and drag to draw a region that is as long as your loop.
  6. Use the Pencil Tool to draw a note at C3 for the entire length of the loop.
  7. Click the Toggle Mode button to switch back to the Edit View.
  8. Right click on the NN19 and click on Initialize Patch.
  9. Click the Browse Sample button.
  10. Find your loop and click OK.
  11. Make sure the Loop On/Off button is lit.
  12. Hit Play and listen to the loop. Pay close attention to what happens when it gets to the end.
  13. Adjust the Tempo to match the loop. TIP: If the loop cuts off early, then the tempo is too fast. If there is a space between when the loop ends and starts again, then the tempo is too slow.
  14. When you've got the tempo just right, do Song Self Contain Settings (File>Song Self Contain Settings) to make sure your loop is locked to your file.
  15. Save your beat as: your name_Funk Loop

Now, using this loop, please create a 2 min. song.
When you're finished, turn it into the Shared Media folder (Shared Media>Student Work>Funk Loop).

Tuesday, January 12, 2010

Pro Tools_Modes and Editing Techniques


Modes

Pro Tools has 4 main "Modes" that determine how your regions can be placed and moved around in the Edit Window. They are:

Slip Mode - Lets everything move freely. This is probably the most common mode for general recording and mixing.

Grid Mode - Moves everything along the lines of a grid that you set up. This is very useful when working with a song that was made in a MIDI-based program (e.g. Reason) because it allows you to edit exactly to the tempo of your song.

Shuffle Mode - Allows you to easily put your regions end to end. It also automatically keeps them all together and lets you change the order they are in without adding any spaces between them.

Spot Mode - Allows you to place a region at a precise location by typing in exactly where you want it to go. When you drag a region from the Region Bin, a dialog box opens asking where to put it. This is used a lot in audio post-production.


Editing Techniques

Separating Regions


  • To make edits, use the Separate Region command. Simply drop the cursor wherever you want to make the cut and hit Command-E.
  • Use crossfades between your final edits to make your edits sound smooth.
  • When you are finished with all your editing, Consolidate them together into one audio file.
Basically, just follow along with the text and put all the speech segments in the correct order. Don't forget to pay attention to the crowd noise; try to avoid making cuts that make the crowd noise sound weird/cut off/etc.

When you are finished, please show the instructor and then move on to the final step of this exercise: consolidating regions.

Consolidating allows you to recombine a bunch of separate regions into one single audio file. Why would you want to do this? Mainly because it allows you to work with all this audio as a single thing, rather than a bunch of different little clips. You can move it all at once, or do additional processing to the whole thing, rather than having to do it for each individual clip. This makes it easier to work with. Plus, it just looks cleaner!

To Consolidate:
  • Use the Grabber Tool and click on the first region you want to include
  • Hold down Shift and click on each of the other regions you want to include
  • Now hit Shift-Option-3 on your keyboard

{MLK Editing Assignment}


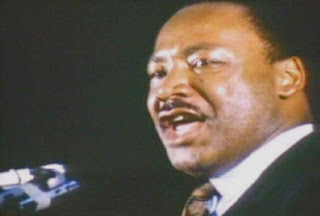
Today we're going to get into some advanced editing techniques. To practice these techniques, we're going to take an audio file from a famous speech (Martin Luther King Jr.'s "I've Been to the Mountaintop" speech) that has been chopped up and put out of order. Your assignment is to reassemble all the segments in the correct order.

First, let's listen to the speech...


Now please do the the following:

Part 1 - Editing

1. Find the folder called "MLK_Mountaintop" in dolly>Shared Media>Class Materials folder and copy it into your folder on your computer.
2. Open that folder and open the file document called "Mountaintop_text". You will be using this as reference for this assignment.
3. Open the Pro Tools session file called "MLK_Mountaintop.ptf". Play it back. What's going on with it?

Obviously the speech is all out of order and messed up. Your assignment is to chop it back up and put the segments in the correct order. To make this process quick, I want you to do two things:
  • To make edits, use the Separate Region command. Simply drop the cursor wherever you want to make the cut and hit Command-E.
  • Put Pro Tools into Shuffle Mode to keep all the different regions stuck together. This will save you the effort of having to manually move them and will eliminate any dead space between the regions.
  • Use crossfades between your final edits to make your edits sound smooth.
  • When you are finished with all your editing, Consolidate them together into one audio file. 
Basically, just follow along with the text and put all the speech segments in the correct order. Don't forget to pay attention to the crowd noise; try to avoid making cuts that make the crowd noise sound weird/cut off/etc.

When you are finished, please show the instructor and then move on to the final step of this exercise: consolidating regions.

Consolidating allows you to recombine a bunch of separate regions into one single audio file. Why would you want to do this? Mainly because it allows you to work with all this audio as a single thing, rather than a bunch of different little clips. You can move it all at once, or do additional processing to the whole thing, rather than having to do it for each individual clip. This makes it easier to work with. Plus, it just looks cleaner!

To Consolidate:
  • Use the Grabber Tool and click on the first region you want to include
  • Hold down Shift and click on each of the other regions you want to include
  • Now hit Shift-Option-3 on your keyboard
Once you finish all this, you can move onto the second part of the assignment.

Part 2 - Add music
  1. Make a note of roughly how long the MLK speech is by looking at the timeline at the top of the Edit Window.
  2. Save your session and Quit out of Pro Tools.
  3. Open Reason.
  4. Make a beat that is a little longer than the speech (~30 sec.) and matches the tone of Dr. King's words. Please include an Intro section that is at least 4 bars long.
  5. When you finish making your beat, save it to your folder as:   your name_MLK beat
  6. Export this beat as an audio file (File>Export Song as Audio File). Again, call it:         your name_MLK beat
  7. Quit Reason.
  8. Launch Pro Tools and open your MLK_Mountaintop session.
  9. When it is open, Import your beat into the session (File>Import>Audio)
  10. Move the speech around so that it comes in at the right time in the beat and flows together well.
  11. Adjust the volume levels of the tracks to make sure that the speech isn't being overwhelmed by the beat.
  12. Give it a nice ending, such as a Fade Out. (Ask one of the instructors if you aren't sure how to do this.)
  13. Save your session.
  14. Bounce the final product out as an audio file. Call it:  your name_MLK speech.
  15. Put a copy in the folder called MLK Speech in Student Work. (dolly>Student Work>MLK Speech)

Welcome Back!


Happy 2010 everybody! Hope you all had a restful holiday and are ready to dive back into the wonderful world of audio production.

So, as we had discussed before the break, we're going to be getting deeper into recording audio and working with Pro Tools. The Million Dollar question is:  What are we going to record?

Today we're going to figure out:
a) Who has something to record
b) How we can get everyone involved in the recording process.

First, let's get a show of hands for how many MCs, singers and instrumentalists we have in the class.