
Last time we did our first audio recordings in Pro Tools. Today you're going to actually work with those recordings and edit and clean them up. Then we'll import your music to your Pro Tools sessions and mix those two tracks together. Before we do that, let's talk a little about how Pro Tools is laid out and how you get around in the program.
First of all, Pro Tools has two main windows:
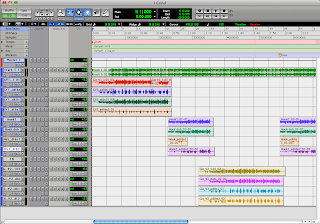
The Edit Window is where you focus on recording, editing and arranging your tracks. It is easy to move things around and make quick adjustments to the regions in your session.
The Mix Window is where you focus on mixing, meaning adjusting volume levels, balancing sounds, and adding FX and dynamics processing.
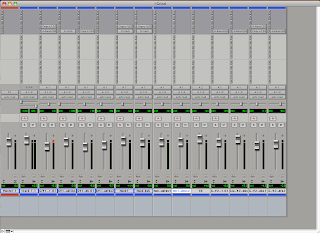
So today we're going to be editing our audio. Which window do you think we're going to be primarily working in?
Tools
In the Edit Window, there are are a set of different tools for you to use to get around and do what you need to do. The toolbar is located at the top of the screen and looks like this:

The tools are:
Zoomer Tool - Lets you zoom in and out around a particular area within a track. Just click and drag around the area you want to see. To zoom out, hold down the OPTION button on your keyboard.

Trim Tool - Lets you adjust the left and right sides of an audio region to quickly get rid of the parts you don't need. It is non-destructive though, so if you want to bring something back, you can just click and drag it back out.

Select Tool - Lets you position the playback cursor or select an area for playback/editing.

Grabber Tool - Lets you grab a whole region and move it around.

Scrubber Tool - Lets you "scrub", or listen closely to a piece of audio by clicking and dragging the cursor over it. Sounds really cool (like a turntable), but unfortunately you can't easily record it!

Pencil Tool - Lets you get in and redraw the waveform data. You mostly use this to repair little pops and clicks in your audio. However, this is a destructive process (meaning you can't undo it), so you should be very careful with how you use it.

And one last tool you should know about...
Smart Tool - Gives you the functions of the Trim, Selector and Grabber tools all at once. You move between these tools by moving the cursor over different parts of the region. In addition to the functions of the tools listed above, the Smart Tool also allows you to do Fades, which we will cover later.

So, now we're going to get into working with these tools to clean up our recordings from the last class.
Part 4 - Edit your recording
- Find your Pro Tools session folder in your folder on the Shared Media drive.
- Copy it to your folder in your computer.
- Find the folder on your your hard drive.
- Double-click on the Pro Tools session file to open it.
- Listen to your recording and pay attention to the little details that don't sound good (little breaths, paper rustling, repeating the lines.
- Make sure you are zoomed in close enough to actually see what's going on.
- Click to highlight the Select Tool.

- Find a spot that you want to clean up and click and drag with the Select Tool to highlight the area.
- Hit Delete on your keyboard to get rid of it.
- Do this with all the areas that you want to clean up.
- Click to highlight the Trim Tool.

- Go to each of the areas you deleted and make any small adjustments to make it sound clean - no cutoff sounds!
- Save your session (File>Save).
Part 5 - Finish and Export your beat from Reason
What is Exporting, and why do you need to do it?
Right now your songs are Reason files (*.rns). They only play back in Reason. You can't burn them to a CD, you can't listen to them in iTunes, you can't upload them to Myspace/imeem/etc., and you can't directly open them in Pro Tools. You can only open them in Reason.
In order for you to do all the things I just mentioned, you need to convert the song into in audio file. Super simple...
- Quit out of Pro Tools.
- Open your Reason session.
- Finish your beat and make sure everything sounds right.
- In the Sequencer Window, scroll to the right until you see the little E.

- Drag it back so it's right at the end of your song.

- Now go to File>Export Song as Audio File.
- Change the filename and make sure that you are saving to your folder. A little window will pop up. Save this as: your name_WhoAreYou
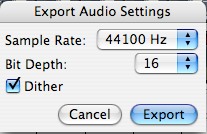
- Make sure it the settings are Sample Rate = 44,100, Bit Depth = 16, then click Export.
- Quit out of Reason.
Part 6 - Import your beat into Pro Tools
- Open your Pro Tools session.
- Go to File>Import>Audio
- In the Window that pops up, find the file you want to import and click Convert. Then click Done.
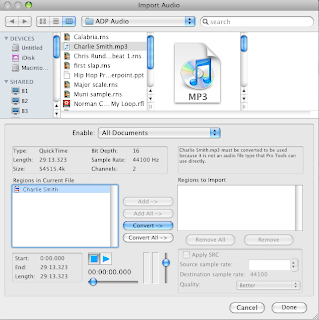
- PT will ask you to select a Destination Folder where the new audio file will be stored. 9/10 times, it will automatically select the Audio Files folder for you. This is where you want to put this audio file.
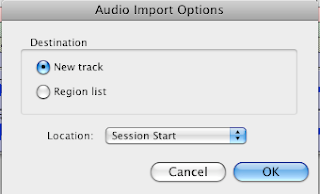
- Lastly, Pro Tools will ask you where you want to put this new file in the actual session. You can either put it in the Region Bin, or you can create a brand new track for it. For now, just select New Track and click OK.

No comments:
Post a Comment