Showing posts with label audio production. Show all posts

Tuesday, February 2, 2010

Song Discussion: "Midnight In A Perfect World"

Today's song is "Midnight In A Perfect World", by DJ Shadow.

A little bit of info...

DJ Shadow is a Bay Area-based DJ and producer. He is a member of the Quannum Projects collective/record label, which has been one of the most successful and long-lasting underground hip hop labels in the Bay. Shadow is credited as being one of the pioneers of sampling. His 1996 album, Endtroducing, is often recognized as being the first album created entirely with samples (though some people would dispute this). As you listen to one of his most famous songs, please think about the following:
  • The title of the song and how the music does/does not fit the title.
  • Try to pick out as many different samples as you can
  • Pay attention to how these samples come in and out
  • There are no real lyrics in this song. How is it structured?
  • Based on the video, what can you tell about him?

Midnight in a Perfect World from DJ Shadow on Vimeo.


OK, for a little more info and perspective, let's take a look at this clip from the 2001 film, Scratch:


What do you know now about Shadow and his feelings about music? What do you think his attitude towards sampling is?

Thursday, January 21, 2010

Song Discussion: "Them Belly Full"

Starting today, I want to start doing something new, where in each class we will listen to one song and analyze it using our understanding of the music production process. The goal is to pay attention to and learn about how some of the world's great artists have used the language of music to produce strong pieces of art. Specifically, we should be focusing on:
  1. The instrumentation
  2. The arrangement
  3. The lyrics
  4. The performance
Please watch and listen to a live performance of the song, "Them Belly Full" by Bob Marley.

Please note that Mr. Marley spoke what is called Patois, a common dialect of Jamaica. Patois is a form of English with strong African influences. In addition, in this song he also throws in some words and terms used by Rastafarians (not all Jamaicans are Rastafarians, by the way!). Sometimes it can be hard for non-speakers to make out all the words. Click here to check out the lyrics.

Questions:
  • What is he talking about? What is the message of the lyrics?
  • What kinds of instruments do you hear in the song?
  • How does the music work to support the message (or not)?
  • Do you think this is a successful piece of work? Does it get its message across?

Thursday, December 10, 2009

Recording Project_Who Are You (pt. 2)


Last time we did our first audio recordings in Pro Tools. Today you're going to actually work with those recordings and edit and clean them up. Then we'll import your music to your Pro Tools sessions and mix those two tracks together. Before we do that, let's talk a little about how Pro Tools is laid out and how you get around in the program.

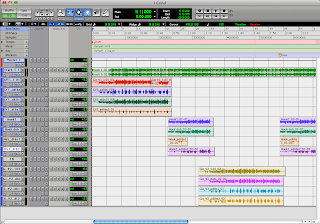
First of all, Pro Tools has two main windows:

The Edit Window is where you focus on recording, editing and arranging your tracks. It is easy to move things around and make quick adjustments to the regions in your session.
The Mix Window is where you focus on mixing, meaning adjusting volume levels, balancing sounds, and adding FX and dynamics processing.
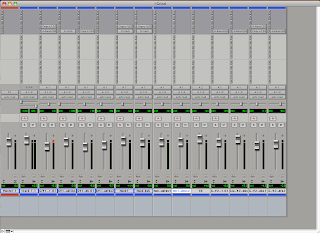

So today we're going to be editing our audio. Which window do you think we're going to be primarily working in?

Tools
In the Edit Window, there are are a set of different tools for you to use to get around and do what you need to do. The toolbar is located at the top of the screen and looks like this:
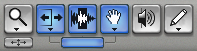
The tools are:

Zoomer Tool - Lets you zoom in and out around a particular area within a track. Just click and drag around the area you want to see. To zoom out, hold down the OPTION button on your keyboard.

Trim Tool - Lets you adjust the left and right sides of an audio region to quickly get rid of the parts you don't need. It is non-destructive though, so if you want to bring something back, you can just click and drag it back out.

Select Tool - Lets you position the playback cursor or select an area for playback/editing.

Grabber Tool - Lets you grab a whole region and move it around.

Scrubber Tool - Lets you "scrub", or listen closely to a piece of audio by clicking and dragging the cursor over it. Sounds really cool (like a turntable), but unfortunately you can't easily record it!

Pencil Tool - Lets you get in and redraw the waveform data. You mostly use this to repair little pops and clicks in your audio. However, this is a destructive process (meaning you can't undo it), so you should be very careful with how you use it.

And one last tool you should know about...

Smart Tool - Gives you the functions of the Trim, Selector and Grabber tools all at once. You move between these tools by moving the cursor over different parts of the region. In addition to the functions of the tools listed above, the Smart Tool also allows you to do Fades, which we will cover later.


So, now we're going to get into working with these tools to clean up our recordings from the last class.

Part 4 - Edit your recording
  1. Find your Pro Tools session folder in your folder on the Shared Media drive.
  2. Copy it to your folder in your computer.
  3. Find the folder on your your hard drive.
  4. Double-click on the Pro Tools session file to open it.
  5. Listen to your recording and pay attention to the little details that don't sound good (little breaths, paper rustling, repeating the lines.
  6. Make sure you are zoomed in close enough to actually see what's going on.
  7. Click to highlight the Select Tool.
  8. Find a spot that you want to clean up and click and drag with the Select Tool to highlight the area.
  9. Hit Delete on your keyboard to get rid of it.
  10. Do this with all the areas that you want to clean up.
  11. Click to highlight the Trim Tool.
  12. Go to each of the areas you deleted and make any small adjustments to make it sound clean - no cutoff sounds!
  13. Save your session (File>Save).

Part 5 - Finish and Export your beat from Reason
What is Exporting, and why do you need to do it?

Right now your songs are Reason files (*.rns). They only play back in Reason. You can't burn them to a CD, you can't listen to them in iTunes, you can't upload them to Myspace/imeem/etc., and you can't directly open them in Pro Tools. You can only open them in Reason.

In order for you to do all the things I just mentioned, you need to convert the song into in audio file. Super simple...

  1. Quit out of Pro Tools.
  2. Open your Reason session.
  3. Finish your beat and make sure everything sounds right.
  4. In the Sequencer Window, scroll to the right until you see the little E.
  5. Drag it back so it's right at the end of your song.
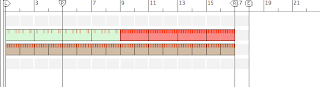
  6. Now go to File>Export Song as Audio File.
  7. Change the filename and make sure that you are saving to your folder. A little window will pop up. Save this as: your name_WhoAreYou
  8. Make sure it the settings are Sample Rate = 44,100, Bit Depth = 16, then click Export.
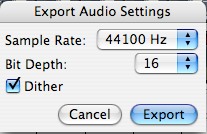
  9. Quit out of Reason.

Part 6 - Import your beat into Pro Tools
  1. Open your Pro Tools session.
  2. Go to File>Import>Audio
  3. In the Window that pops up, find the file you want to import and click Convert. Then click Done.
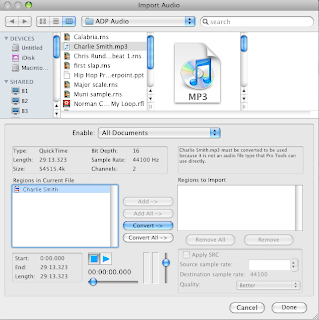
  4. PT will ask you to select a Destination Folder where the new audio file will be stored. 9/10 times, it will automatically select the Audio Files folder for you. This is where you want to put this audio file.
  5. Lastly, Pro Tools will ask you where you want to put this new file in the actual session. You can either put it in the Region Bin, or you can create a brand new track for it. For now, just select New Track and click OK.
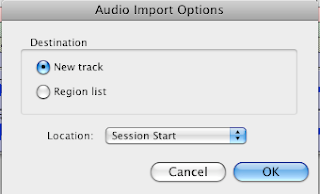
Monday, October 5, 2009

Introducing Reason & Redrum (pt. 1)

For the first part of this class, we will mainly be using a software program called Reason. Reason is a program that gives you lots of different sounds to choose from and an easy way of building beats from scratch.

There are two main sections of the screen in Reason: the Instrument Rack and the Sequencer.

The Instrument Rack is the top part of the screen. This is where you can put all the different instruments you want to work with, such as drum machines, samplers and synthesizers. At the top of the Rack, you should always see a Mixer, which is where all the instruments get mixed together. If you don't see a Mixer, you might have to Create one.

instrumentrack.jpg

The Sequencer is where you actually lay down your tracks and record yourself playing.

sequence.jpg

Today we're going to jump right in and start making a beat. To do this, we will be working with an instrument called the Redrum Drum Computer. It looks like this:

redrummain.jpg

Don't get overwhelmed by all the knobs and stuff. It's actually really easy to use. For now, here's what you need to know...

Each one of these sections has a different drum sound in it. For example, Sound 1 might be a bass, Sound 2 a clap, Sound 3 a hi hat, etc. To hear what they are, click on the little triangle in the upper-right corner of each Sound.

When you want to start working with a sound, click on the SELECT button at the bottom of that section.

select.jpg

Now this is the section of the Redrum where you actually program your beat:

redrumsection.jpg

Just click on the little boxes and then hit the RUN button to hear it play back.

run.jpg

When you want to add another sound, click the SELECT button under that sound and then click on the boxes. You can keep adding sounds and going back and changing things as much as you want.

Another thing you should know about is Tempo. Tempo is the speed of a piece of music - how fast it's playing back. Tempo is measured in Beats Per Minute, or BPM.

In Reason, you can adjust the Tempo at the bottom of the screen.

tempo.jpg

Just find the number (it's usually 120 to start with) and click the up or down arrows next to it. Up makes the beat faster, down makes it slower.

Alright, are you ready to do this? Here we go...

Please do the following:

  1. Open Reason.
  2. Start a new session by going to the File menu in the upper-left corner of the screen and clicking on New.
  3. If you don't see a mixer: go to the Create menu and select a Mixer 14:2
  4. Set Tempo to 98 bpm. You should see the Tempo on the bottom of the screen near the play button.
  5. CREATE a Redrum Drum Machine (Create>Redrum Drum Machine).
  6. Click on the Folder Button in the bottom left corner of the Redrum.
  7. Click on the red icon on the left side called Reason Factory Sound Bank
  8. Double-click on the Redrum Drum Kits folder.
  9. Double-click on the Hip Hop Kits folder.
  10. Double-click on the file called Hip Hop Kit 07 folder.
  11. Push SELECT on Sound 3. In the Step Sequencer, click on Boxes 5 and 13.
  12. picture1.png
  13. Push SELECT on Sound 5. Click on Boxes 1 and11.
  14. picture2.png
  15. Push SELECT on Sound 1. Click on all the boxes.
  16. picture3.png

    Congratulations! You have made your first beat!

  17. Now click on Pattern 2 and create your own beat with a Clap or Snare, Bass Drum, and Hi Hat.
  18. Remember start with a Clap (clp) or Snare (sn) on 5 and 13
  19. And put your Bass Drum on 1 and a few other boxes (but not boxes 5 or 13).
  20. Put your Hi Hat (HH) anywhere.
  21. Now let's save the beat...

  22. First,make sure you have created a folder on your computer where you can save all your work. Ask the instructor if you're not sure about this.
  23. In Reason, go to the File menu and click SAVE.
  24. When the window pops up, find your folder and double-click on it.
  25. In the area of the window where it says Name File, type in:your name_1st beat
  26. Click Save.

Now that you have made this drum beat, click on Pattern 3 and try to start a new drum beat with any Tempo between 80-110bpm.