Showing posts with label Chris Runde. Show all posts

Thursday, February 4, 2010

{Friday Night_Finishing Up}

Your Friday Night projects are due today! I'm hoping to send these over to KQED tomorrow, so today we need to focus on pulling them together and getting them polished up. Here's a list of all the steps you need to do to complete the project:
  1. Record your interview.
  2. Edit the interview (get rid of extra noise, pops and clicks, etc.) Remember, this should be 2 minutes long MAX!
  3. Put a compressor on your vocal track to smooth it out.
  4. Create a beat in Reason and export it as an audio file. (click here if you don't remember how to do this.)
  5. Import the audio file of your beat into your Pro Tools session. (click here if you don't remember how to do this.)
  6. Balance the volume levels of your vocal and music tracks and add automation, fades, etc. if desired.
  7. Bounce a stereo audio file of your project out of Pro Tools.
  8. Import the stereo audio file to iTunes and create an MP3 version of it.
  9. Turn in the MP3 file of your project along with the Pro Tools session.
Couple things you should do to make sure your project sounds as good as possible:

Create a Master Fader
A Master Fader lets you see and control the volume levels of all your tracks. This is important because sometimes your individual tracks don't look like they are clipping (hitting the red), but when they are all playing together, the overall loudness is too much for Pro Tools to handle. You NEVER want to see the red lights light up on your Master Fader track. With a Master Fader, you can see what the true volume of your project is and adjust it if necessary. It's also an easy way to create a fade outs/fade ins for your project. (see Volume Automation below)

To create a Master Fader:
  1. In the Track Menu, click on New. (Track>New)
  2. In the window that pops up, select Stereo Master Fader and click Create.
  3. In your Edit Window, you should now see an extra track that looks like this:

Tuesday, February 2, 2010

Song Discussion: "Midnight In A Perfect World"

Today's song is "Midnight In A Perfect World", by DJ Shadow.

A little bit of info...

DJ Shadow is a Bay Area-based DJ and producer. He is a member of the Quannum Projects collective/record label, which has been one of the most successful and long-lasting underground hip hop labels in the Bay. Shadow is credited as being one of the pioneers of sampling. His 1996 album, Endtroducing, is often recognized as being the first album created entirely with samples (though some people would dispute this). As you listen to one of his most famous songs, please think about the following:
  • The title of the song and how the music does/does not fit the title.
  • Try to pick out as many different samples as you can
  • Pay attention to how these samples come in and out
  • There are no real lyrics in this song. How is it structured?
  • Based on the video, what can you tell about him?

Midnight in a Perfect World from DJ Shadow on Vimeo.


OK, for a little more info and perspective, let's take a look at this clip from the 2001 film, Scratch:


What do you know now about Shadow and his feelings about music? What do you think his attitude towards sampling is?

Thursday, January 21, 2010

Song Discussion: "Them Belly Full"

Starting today, I want to start doing something new, where in each class we will listen to one song and analyze it using our understanding of the music production process. The goal is to pay attention to and learn about how some of the world's great artists have used the language of music to produce strong pieces of art. Specifically, we should be focusing on:
  1. The instrumentation
  2. The arrangement
  3. The lyrics
  4. The performance
Please watch and listen to a live performance of the song, "Them Belly Full" by Bob Marley.

Please note that Mr. Marley spoke what is called Patois, a common dialect of Jamaica. Patois is a form of English with strong African influences. In addition, in this song he also throws in some words and terms used by Rastafarians (not all Jamaicans are Rastafarians, by the way!). Sometimes it can be hard for non-speakers to make out all the words. Click here to check out the lyrics.

Questions:
  • What is he talking about? What is the message of the lyrics?
  • What kinds of instruments do you hear in the song?
  • How does the music work to support the message (or not)?
  • Do you think this is a successful piece of work? Does it get its message across?

Tuesday, December 15, 2009

Recording Project_Who Are You (pt. 3)

Reminder: Family Night is this Thursday, Dec. 17.

Bring a family member, bring a friend, bring anyone you want to share your work with. Light refreshments will be served!

Final Makeup Lab: Friday, Dec. 18

If you need to makeup hours and you want to continue with this class after the break, you need to come to this!


Today, we are going to focus on getting our work ready for Family Night. By the end of the day, everyone must turn in the following things:

  1. The Pro Tools session folder for your completed "Who Am I?" projects. (including an appropriate beat, clean edits of your recording, with the recording arranged well with the beat).
  2. 2-3 COMPLETE songs (containing complex song structure, interesting instrumentation)
You must have Quinn check off your work before you turn it in! When he has approved it, please put a copies in: Shared Media>dolly>Student Work>Family Night>(your name)


Before I let you get to work, I want to take a quick minute to talk about how all the information and media is stored in Pro Tools. This is very important to know when you start moving sessions from place to place, as you will be moving your sessions onto the Shared Media folder today.

Pro Tools Folder Hierarchy
When first start a new session, this window pops up:

What you are doing in this window is deciding a couple of things:
  1. The name of the session
  2. What quality (Sample Rate, Bit Depth) you want your session to be (higher resolution = more CPU and memory required)
  3. What file format (AIF, WAV, MP3, etc.) you want the audio to be
  4. Where on your hard drive you want to store the session
Then, once you hit "Save", Pro Tools creates a new folder containing some specific things. Take a look...
Here is the folder for my new session.If I go inside this folder, this is what I will see.

So what is all this stuff?
  • Pro Tools session file - this is the actual "file" that you open to work with Pro Tools. However, it doesn't actually have any audio in it. It's just a window that lets you work with files that are actually located somewhere else - sort of like one of those remote controlled robots that astronauts use.
  • Audio files folder - this is where all your recordings and imported audio is actually saved. This is folder is actually more important than the Pro Tools session file
  • Session file backups - Pro Tools periodically does an automatic save for you, just in case your computer crashes, or some catastrophe hits. You can load these files to recover your work.
  • Wavecache - This is basically a file that contains a picture of what you are supposed to see in your Edit Window.
  • The other folders (Region Groups, Video Files, Fade Files) you don't need to worry about at this point. They all store information related to specific processes in Pro Tools that we will get to later. Just be aware that they are there!
The most important thing that you need to understand is this: a Pro Tools session file, which looks like this: is nothing by itself.

When you are trying to move or back up a copy of your Pro Tools session, you must copy the entire folder that contains all the other folders inside it, especially the Audio Files folder!!!

Thursday, December 10, 2009

Recording Project_Who Are You (pt. 2)


Last time we did our first audio recordings in Pro Tools. Today you're going to actually work with those recordings and edit and clean them up. Then we'll import your music to your Pro Tools sessions and mix those two tracks together. Before we do that, let's talk a little about how Pro Tools is laid out and how you get around in the program.

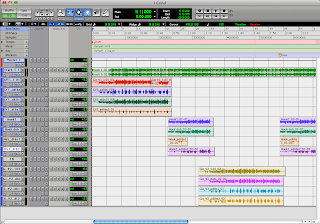
First of all, Pro Tools has two main windows:

The Edit Window is where you focus on recording, editing and arranging your tracks. It is easy to move things around and make quick adjustments to the regions in your session.
The Mix Window is where you focus on mixing, meaning adjusting volume levels, balancing sounds, and adding FX and dynamics processing.
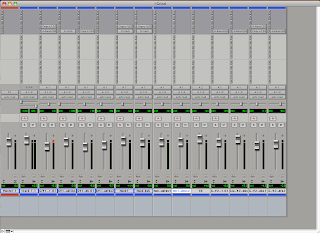

So today we're going to be editing our audio. Which window do you think we're going to be primarily working in?

Tools
In the Edit Window, there are are a set of different tools for you to use to get around and do what you need to do. The toolbar is located at the top of the screen and looks like this:
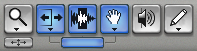
The tools are:

Zoomer Tool - Lets you zoom in and out around a particular area within a track. Just click and drag around the area you want to see. To zoom out, hold down the OPTION button on your keyboard.

Trim Tool - Lets you adjust the left and right sides of an audio region to quickly get rid of the parts you don't need. It is non-destructive though, so if you want to bring something back, you can just click and drag it back out.

Select Tool - Lets you position the playback cursor or select an area for playback/editing.

Grabber Tool - Lets you grab a whole region and move it around.

Scrubber Tool - Lets you "scrub", or listen closely to a piece of audio by clicking and dragging the cursor over it. Sounds really cool (like a turntable), but unfortunately you can't easily record it!

Pencil Tool - Lets you get in and redraw the waveform data. You mostly use this to repair little pops and clicks in your audio. However, this is a destructive process (meaning you can't undo it), so you should be very careful with how you use it.

And one last tool you should know about...

Smart Tool - Gives you the functions of the Trim, Selector and Grabber tools all at once. You move between these tools by moving the cursor over different parts of the region. In addition to the functions of the tools listed above, the Smart Tool also allows you to do Fades, which we will cover later.


So, now we're going to get into working with these tools to clean up our recordings from the last class.

Part 4 - Edit your recording
  1. Find your Pro Tools session folder in your folder on the Shared Media drive.
  2. Copy it to your folder in your computer.
  3. Find the folder on your your hard drive.
  4. Double-click on the Pro Tools session file to open it.
  5. Listen to your recording and pay attention to the little details that don't sound good (little breaths, paper rustling, repeating the lines.
  6. Make sure you are zoomed in close enough to actually see what's going on.
  7. Click to highlight the Select Tool.
  8. Find a spot that you want to clean up and click and drag with the Select Tool to highlight the area.
  9. Hit Delete on your keyboard to get rid of it.
  10. Do this with all the areas that you want to clean up.
  11. Click to highlight the Trim Tool.
  12. Go to each of the areas you deleted and make any small adjustments to make it sound clean - no cutoff sounds!
  13. Save your session (File>Save).

Part 5 - Finish and Export your beat from Reason
What is Exporting, and why do you need to do it?

Right now your songs are Reason files (*.rns). They only play back in Reason. You can't burn them to a CD, you can't listen to them in iTunes, you can't upload them to Myspace/imeem/etc., and you can't directly open them in Pro Tools. You can only open them in Reason.

In order for you to do all the things I just mentioned, you need to convert the song into in audio file. Super simple...

  1. Quit out of Pro Tools.
  2. Open your Reason session.
  3. Finish your beat and make sure everything sounds right.
  4. In the Sequencer Window, scroll to the right until you see the little E.
  5. Drag it back so it's right at the end of your song.
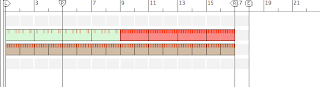
  6. Now go to File>Export Song as Audio File.
  7. Change the filename and make sure that you are saving to your folder. A little window will pop up. Save this as: your name_WhoAreYou
  8. Make sure it the settings are Sample Rate = 44,100, Bit Depth = 16, then click Export.
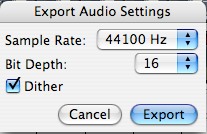
  9. Quit out of Reason.

Part 6 - Import your beat into Pro Tools
  1. Open your Pro Tools session.
  2. Go to File>Import>Audio
  3. In the Window that pops up, find the file you want to import and click Convert. Then click Done.
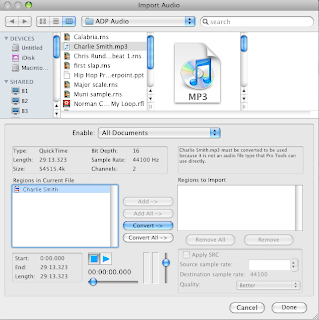
  4. PT will ask you to select a Destination Folder where the new audio file will be stored. 9/10 times, it will automatically select the Audio Files folder for you. This is where you want to put this audio file.
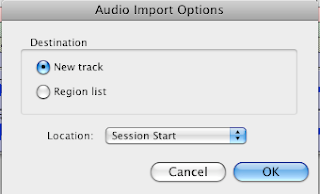
  5. Lastly, Pro Tools will ask you where you want to put this new file in the actual session. You can either put it in the Region Bin, or you can create a brand new track for it. For now, just select New Track and click OK.
Monday, October 5, 2009

Redrum (pt.2)_Bars & Beats & Drums & stuff

Last time we started making our own beats, so now we should take a few minutes to go over a couple of concepts so that we can understand each other when we talk about music.

Here are a few musical terms that I want you to know:
  • Beat - A unit of counting musical time. Think of them as "seconds".
  • Bar - A group of beats (usually 4). Think of them as "minutes".
  • Tempo - The speed of a piece of music.
The Drums
If you want to talk about beats, then you have to talk about drums. And if you want to talk about drums, then it is important to understand a little bit about what the different sounds are and what role they play in making a drum beat.

Take a look at the picture of a standard drum kit below:

Out of all the different parts, the three most important ones are:

1. the Snare
2. the Bass Drum
(aka "Kick")
3. the Hi Hat

These three instruments hold down the core of the beat, while all the others just add extra excitement at certain times. In general...

The Snare holds the beat steady. That's why it usually hits steadily on the 2 and the 4. In hip hop, a clap or snap can serve the same purpose.

The Bass (aka Kick) drum defines the rhythm and tells you when to nod your head! That's why you almost always hear the Bass on the first beat of the bar ("the 1")

The Hi Hat accents the rhythm and adds flavor to the overall feel of the beat. One important thing to know about the Hi Hat is that it can open and close. When it's closed, it makes a nice, tight sound ("tick, tick, tick"). When it's open, it makes a loud ringing sound ("TSHH!")

Let's take a look at this video of a guy playing the drums. Pay attention to which instruments he's hitting and what kinds of sounds they make. Try to count along with him (1,2,3,4) as he plays, remember: the snare hits on the 2 and the 4!

click here

Now that we know something about how real drums are played, we can apply this information to making our own beats using the Redrum. Right now you're going make up a beat for a famous song called, "Calabria".

  1. Double click on the Macintosh HD icon on your desktop.
  2. Double click on your folder to open it.
  3. Now find the Media Share icon on your desktop to open it. (If you don't see it, ask one of the instructors for help).
  4. Go into the folder called Class Materials.
  5. Find the file called "Calabria.rns" and drag it into your folder.
  6. Once it is transferred into your folder, double click on the file to open it. It should look like this:
  7. Hit the Spacebar to listen to the melody. Ever heard it?
  8. Now Create a Redrum Drum Machine.
  9. Click on the Browse Patch button.
  10. Click on House Kit 03 from the list.
  11. Now click on the Select button under Sound 2.
  12. In the Sequencer section, click on Boxes 5 and 13.
  13. Click the Select button under Sound 1.
  14. In the Sequencer section, Click on Box 1 and wherever else you think sounds good.
  15. Now click on the Select button under Sound 6, 7, or 8.
  16. Click on any boxes that you think sound good.
  17. Add any additional sounds that you like to your beat.
  18. Now Save this to your folder as your name_Calabria.
If you have extra time, try doing this
  1. Click on Pattern 2 in the Redrum.
  2. Copy the first pattern to the track in the Sequencer Window from Bar 1 to Bar 9, then have the second pattern come in from Bar 9 to Bar 13.
  3. Copy the melody so that it plays over your first pattern (Pattern 1) and then stops for the second pattern. (Hint: Hold down the Option button and click and drag your pattern.)
  4. Show the instructor when you are finished.

Welcome to Advanced Audio!


Welcome to the first day of Digital Pathways Advanced Audio!

I hope you are ready to put your energy into making some great music and producing interesting audio projects.
Whether you've got years of musical experience, or this is your first time playing a note, I expect you to challenge yourself in your work here.

This is the class blog where I will be posting lectures, assignments and other information.


Class Expectations
As a member of this class, you are expected to:

1. Put forth your best effort in participating. Effort is shown through completing assignments, participating in class discussions and helping your fellow students to learn.
2.
Be on time to all classes. If it is not possible for you to attend a particular class, you must let the instructor know in advance in order to be credited for your hours.
3. Behave in a mature, professional manner at all times. Respect your classmates, instructors, guests and neighbors in the 410 Townsend building.
4. Understand that 410 Townsend is a shared space where a lot of people come to work. This is not your house. This is not your high school. Part of the deal with us having a class here is the assumption that our students are capable of behaving maturely as any other person in the building. The following behaviors are considered inappropriate and are grounds for being asked to leave the program:
  • Any physical or verbal threat of violence.
  • Any discriminatory statements based on race, nationality, religion, gender or sexual orientation.
  • Drug use.
  • Irresponsible use of the equipment.
  • Any behavior that results in complaints from the management or residents of 410 Townsend St.