
Showing posts with label audio. Show all posts

Tuesday, February 9, 2010

Guest Speaker: Do D.A.T.

Today we have a special guest speaker, Mr. Davin "Do D.A.T." Thompson. D.A.T. is a performer, educator, and veteran of the Bay Area hip hop community. He is a founding member of the Oakland-based group, the Attik, and has shared stages with a number of hip hop legends, including Dead Prez, Mistah F.A.B., KRS One and E-40. He is the resident Lyrics Coach for BAVC's BUMP Records program. His new full-length album, Oakland In Blue, is set for release in Spring 2010.

D.A.T. is here to talk about how we can expand our perspectives towards creative projects in general and lyric writing in particular. Even if you are primarily a producer or engineer, rather than a lyricist, it is important to be able to project your understanding of art beyond what you do so that you can understand where people working in other areas are coming from. Please give Dat your attention today and make him feel welcome in our class!

Thursday, February 4, 2010

{Friday Night_Finishing Up}

Your Friday Night projects are due today! I'm hoping to send these over to KQED tomorrow, so today we need to focus on pulling them together and getting them polished up. Here's a list of all the steps you need to do to complete the project:
  1. Record your interview.
  2. Edit the interview (get rid of extra noise, pops and clicks, etc.) Remember, this should be 2 minutes long MAX!
  3. Put a compressor on your vocal track to smooth it out.
  4. Create a beat in Reason and export it as an audio file. (click here if you don't remember how to do this.)
  5. Import the audio file of your beat into your Pro Tools session. (click here if you don't remember how to do this.)
  6. Balance the volume levels of your vocal and music tracks and add automation, fades, etc. if desired.
  7. Bounce a stereo audio file of your project out of Pro Tools.
  8. Import the stereo audio file to iTunes and create an MP3 version of it.
  9. Turn in the MP3 file of your project along with the Pro Tools session.
Couple things you should do to make sure your project sounds as good as possible:

Create a Master Fader
A Master Fader lets you see and control the volume levels of all your tracks. This is important because sometimes your individual tracks don't look like they are clipping (hitting the red), but when they are all playing together, the overall loudness is too much for Pro Tools to handle. You NEVER want to see the red lights light up on your Master Fader track. With a Master Fader, you can see what the true volume of your project is and adjust it if necessary. It's also an easy way to create a fade outs/fade ins for your project. (see Volume Automation below)

To create a Master Fader:
  1. In the Track Menu, click on New. (Track>New)
  2. In the window that pops up, select Stereo Master Fader and click Create.
  3. In your Edit Window, you should now see an extra track that looks like this:

Tuesday, February 2, 2010

{Friday Night (pt. 2)_Using a Compressor}


Once you've got your Friday Night statements recorded, you can start editing them down to make a single, smooth statement. These can only be 2 minutes max (including music), so please watch the time in the timeline!

As in our earlier assignments, I want these to be very cleanly edited, so please be sure to do all the following:
  • Get rid of all the extra noise when the interviewee (you) isn't speaking.
  • Zoom in and make your cuts on the zero line crossing
  • If you stick two regions together, be sure to use crossfades between them to make the transitions smooth.
  • Don't be afraid to rearrange the things being said. Put them in whatever order makes sense to you.
  • When you add music, pay attention to the relationship between the music and the vocal. Feel free to move things along so that they work better with the beat.
Once you have finished editing, you're also going to practice working with another tool to help you smooth out your vocal: a compressor!

A compressor is an audio processor that automatically adjusts the loudness of your track. They are very commonly used in all areas of audio and, in my opinion, really help to create that polished, "professional" sound. Compressors can be used in a few different ways for different reasons. Today, we'll be using them to balance out the volume level of our recordings and make it so that the sound of the person's voice stays very even throughout the piece - never too loud or soft.

Please do the following:
  1. Copy your Pro Tools session folder from the Shared Media drive to your computer.
  2. Open the session.
  3. Mute the track that the interviewer was recorded on.
  4. Listen carefully to the recording of your voice. Pay special attention to places where your voice gets softer than other places.
  5. Make sure Loop Playback is turned on.
  6. Highlight a short (5-10 second section) where you have both a loud part and a short part. Hit play and just let it loop.
  7. Go to the Mix Window (Command =).
  8. Find the dark grey section at the top. This is what is called the Inserts section.
  9. On the track with your voice, click on one of the double arrows in the Inserts. Click on: plugins>Dynamics>Compressor/LimiterDyn3
  10. You should see this window pop up:
  11. Can you hear a difference in the sound already? You can always click on the bypass button to check what the audio sounds like without the compressor, but remember to click on bypass again to turn the compressor back on.
  12. Find the knob called Ratio and set it to 4.0:1. This will affect how much we are compressing the signal. In this case, we're keeping it pretty light.
  13. Now, while you are listening to the track play back, watch the meter that says GR at the bottom. Pay attention to how low the orange meter gets at the LOUDEST part of your recording.
  14. Find the knob called Threshold. Keeping your eye on the GR meter, slowly start turning the Threshold until the GR hits about -6 at its lowest point.
  15. Find the knob called Gain. Turn it up until to 6.0 dB.
  16. Click bypass to check what the vocal sounds like without compression. Click bypass again to check what it sounds like with compression. Smoother?
  17. Now find the knob called Release. Turn this all the way up and then slowly start turning it back down. While you are turning it, watch the GR meter. You want to see the meter bouncing fairly quickly, but smoothly - not UP-DOWN-UP-DOWN
  18. Now lastly, find the knob called Attack. Turn it all the way up and then slowly start turning it back down. You want to listen carefully for the point where the voice starts to get a little muffled, and stop. (Actually, you should probably turn it back to a little above that.)
  19. Click again on bypass. Listen and pay attention to what the track sounds like without the compressor and with it. If it sounds pretty good, but not quite right, try adjusting some of the knobs and see if you can fix it.
  20. Save!!!
  21. Have one of the instructors come over and check out your work.

Thursday, December 10, 2009

Recording Project_Who Are You (pt. 2)


Last time we did our first audio recordings in Pro Tools. Today you're going to actually work with those recordings and edit and clean them up. Then we'll import your music to your Pro Tools sessions and mix those two tracks together. Before we do that, let's talk a little about how Pro Tools is laid out and how you get around in the program.

First of all, Pro Tools has two main windows:

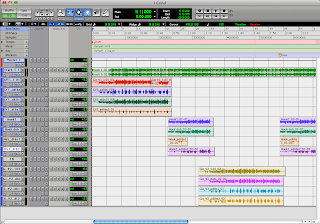
The Edit Window is where you focus on recording, editing and arranging your tracks. It is easy to move things around and make quick adjustments to the regions in your session.
The Mix Window is where you focus on mixing, meaning adjusting volume levels, balancing sounds, and adding FX and dynamics processing.
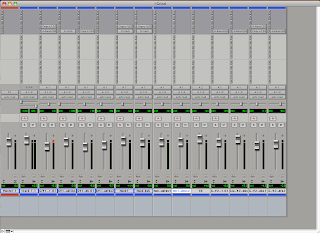

So today we're going to be editing our audio. Which window do you think we're going to be primarily working in?

Tools
In the Edit Window, there are are a set of different tools for you to use to get around and do what you need to do. The toolbar is located at the top of the screen and looks like this:
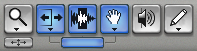
The tools are:

Zoomer Tool - Lets you zoom in and out around a particular area within a track. Just click and drag around the area you want to see. To zoom out, hold down the OPTION button on your keyboard.

Trim Tool - Lets you adjust the left and right sides of an audio region to quickly get rid of the parts you don't need. It is non-destructive though, so if you want to bring something back, you can just click and drag it back out.

Select Tool - Lets you position the playback cursor or select an area for playback/editing.

Grabber Tool - Lets you grab a whole region and move it around.

Scrubber Tool - Lets you "scrub", or listen closely to a piece of audio by clicking and dragging the cursor over it. Sounds really cool (like a turntable), but unfortunately you can't easily record it!

Pencil Tool - Lets you get in and redraw the waveform data. You mostly use this to repair little pops and clicks in your audio. However, this is a destructive process (meaning you can't undo it), so you should be very careful with how you use it.

And one last tool you should know about...

Smart Tool - Gives you the functions of the Trim, Selector and Grabber tools all at once. You move between these tools by moving the cursor over different parts of the region. In addition to the functions of the tools listed above, the Smart Tool also allows you to do Fades, which we will cover later.


So, now we're going to get into working with these tools to clean up our recordings from the last class.

Part 4 - Edit your recording
  1. Find your Pro Tools session folder in your folder on the Shared Media drive.
  2. Copy it to your folder in your computer.
  3. Find the folder on your your hard drive.
  4. Double-click on the Pro Tools session file to open it.
  5. Listen to your recording and pay attention to the little details that don't sound good (little breaths, paper rustling, repeating the lines.
  6. Make sure you are zoomed in close enough to actually see what's going on.
  7. Click to highlight the Select Tool.
  8. Find a spot that you want to clean up and click and drag with the Select Tool to highlight the area.
  9. Hit Delete on your keyboard to get rid of it.
  10. Do this with all the areas that you want to clean up.
  11. Click to highlight the Trim Tool.
  12. Go to each of the areas you deleted and make any small adjustments to make it sound clean - no cutoff sounds!
  13. Save your session (File>Save).

Part 5 - Finish and Export your beat from Reason
What is Exporting, and why do you need to do it?

Right now your songs are Reason files (*.rns). They only play back in Reason. You can't burn them to a CD, you can't listen to them in iTunes, you can't upload them to Myspace/imeem/etc., and you can't directly open them in Pro Tools. You can only open them in Reason.

In order for you to do all the things I just mentioned, you need to convert the song into in audio file. Super simple...

  1. Quit out of Pro Tools.
  2. Open your Reason session.
  3. Finish your beat and make sure everything sounds right.
  4. In the Sequencer Window, scroll to the right until you see the little E.
  5. Drag it back so it's right at the end of your song.
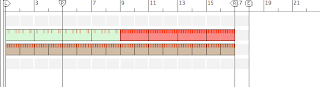
  6. Now go to File>Export Song as Audio File.
  7. Change the filename and make sure that you are saving to your folder. A little window will pop up. Save this as: your name_WhoAreYou
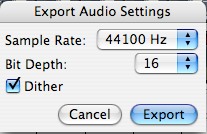
  8. Make sure it the settings are Sample Rate = 44,100, Bit Depth = 16, then click Export.
  9. Quit out of Reason.

Part 6 - Import your beat into Pro Tools
  1. Open your Pro Tools session.
  2. Go to File>Import>Audio
  3. In the Window that pops up, find the file you want to import and click Convert. Then click Done.
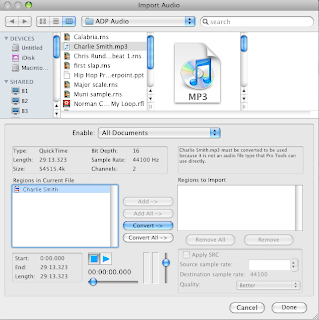
  4. PT will ask you to select a Destination Folder where the new audio file will be stored. 9/10 times, it will automatically select the Audio Files folder for you. This is where you want to put this audio file.
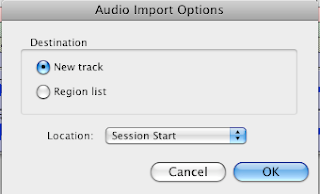
  5. Lastly, Pro Tools will ask you where you want to put this new file in the actual session. You can either put it in the Region Bin, or you can create a brand new track for it. For now, just select New Track and click OK.
Monday, October 5, 2009

Welcome to Advanced Audio!


Welcome to the first day of Digital Pathways Advanced Audio!

I hope you are ready to put your energy into making some great music and producing interesting audio projects.
Whether you've got years of musical experience, or this is your first time playing a note, I expect you to challenge yourself in your work here.

This is the class blog where I will be posting lectures, assignments and other information.


Class Expectations
As a member of this class, you are expected to:

1. Put forth your best effort in participating. Effort is shown through completing assignments, participating in class discussions and helping your fellow students to learn.
2.
Be on time to all classes. If it is not possible for you to attend a particular class, you must let the instructor know in advance in order to be credited for your hours.
3. Behave in a mature, professional manner at all times. Respect your classmates, instructors, guests and neighbors in the 410 Townsend building.
4. Understand that 410 Townsend is a shared space where a lot of people come to work. This is not your house. This is not your high school. Part of the deal with us having a class here is the assumption that our students are capable of behaving maturely as any other person in the building. The following behaviors are considered inappropriate and are grounds for being asked to leave the program:
  • Any physical or verbal threat of violence.
  • Any discriminatory statements based on race, nationality, religion, gender or sexual orientation.
  • Drug use.
  • Irresponsible use of the equipment.
  • Any behavior that results in complaints from the management or residents of 410 Townsend St.